How to Test a Car Battery With a Multimeter: Easy Steps
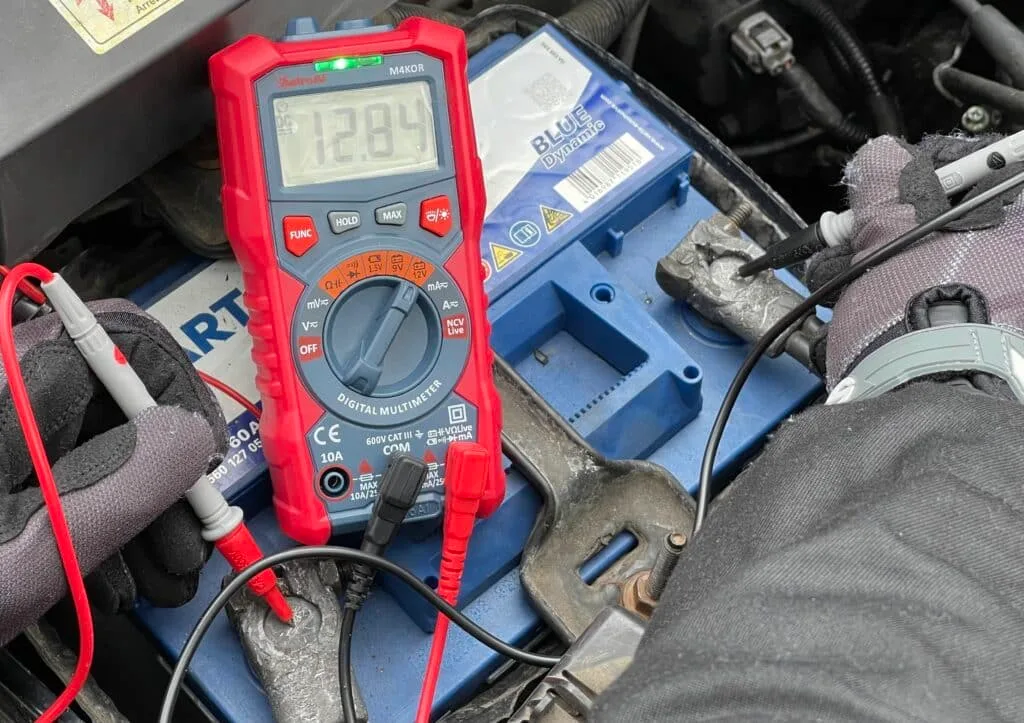
Testing a car battery takes one cheap tool and about sixty seconds, yet most drivers still guess. Once you know how to use a multimeter on a car battery, you can tell in a glance whether that slow crank on a cold morning means a dying battery, a lazy alternator, or just corroded terminals. No shop visit, no waiting on a tow truck's verdict.
The numbers do the talking. Per SAE J537, the industry standard for battery testing, a fully charged 12V lead-acid battery should read about 12.6 volts at rest. Anything meaningfully below that tells a story, and this guide will teach you to read it.
First, though, let's cover the fast version.
Quick Answer
To use a multimeter on a car battery, set the dial to DC volts. Plug the black lead into COM and the red lead into VΩmA. Touch the red probe to the positive terminal.
Touch the black probe to the negative terminal. A healthy resting battery reads 12.4 to 12.7 volts. Below 12.0 volts means the battery needs charging or testing.
The 60-Second Answer: What Your Multimeter Should Read on a Healthy Battery
Three quick numbers cover almost every situation you'll meet. Memorize these and you're already ahead of most drivers.
| Test | When You Do It | Healthy Reading |
|---|---|---|
| Resting voltage | Engine off, car sat 1+ hours | 12.4 to 12.7V |
| Cranking voltage | While the starter turns | Stays above 9.6V |
| Charging voltage | Engine running | 13.5 to 14.7V |
If your battery hits all three, it's healthy and the charging system is doing its job. Miss one, and the failed test points you straight at the culprit. A good resting number with a bad cranking number means a weak battery.
A good battery with a low running number means the alternator is slacking.
Those thresholds assume a standard flooded 12V battery, which is still what most cars run as of 2026. AGM and stop-start batteries shift the numbers slightly, and we'll cover that later in the guide.
Why Testing a Car Battery Is a Visual Skill (Dial Symbols, Ports, and Probes)
Here's the honest truth about this job: the electrical theory is trivial. The part that trips people up is entirely visual. You're matching a symbol on a crowded dial, picking the right two of three or four ports, and touching color-coded probes to the right posts.
Get any one of those wrong and you'll either get a nonsense reading or, in one specific case, a blown fuse. That's why every step below describes exactly what you should be looking at, not just what to do.
Three visual checkpoints matter before anything touches the battery:
- The dial symbol. You want DC volts, which looks like a V with a straight line over a dashed line. Not the V with a wavy line. That's AC, and it will read garbage on a battery.
- The ports. Black lead in the port marked COM. Red lead in the port marked VΩmA or similar. Never the port marked 10A for this job.
- The probes and posts. Red to the positive post (marked + and usually under a red cover). Black to the negative post (marked −).
If your meter's face looks like alphabet soup right now, a quick tour through every marking on the dial will make the rest of this guide click faster. The good news is that battery testing only ever uses one dial position.
Setting Up Your Multimeter: Finding DC Volts and Plugging In the Leads Correctly
Setup takes under a minute, and it's the same on a $15 hardware-store meter as it is on a $400 Fluke. Manufacturer documentation from Fluke confirms the port and dial conventions are consistent across nearly every handheld meter on the market. Learn it once and you've learned them all.

What the DC Voltage Symbol Looks Like (and How It Differs From AC)
The DC voltage symbol is a capital V with a solid line above a dashed line. Some meters print it as V⎓ or simply DCV. This is the only setting you need for battery work, and our full breakdown of that dial position explains why it applies to anything battery-powered.
The trap sits right next door on most dials. The AC setting shows a V with a wavy tilde (V~), and it's meant for wall outlets, not batteries. Select it by mistake and the display will show zero or a meaningless flicker.
Nothing breaks, but plenty of people have condemned a perfectly good battery over that one dial click.
One more choice on manual-ranging meters: pick the 20V range. A car battery sits around 12.6V, so 20V is the smallest range that fits, which gives you the most precise reading. If your meter has no range numbers, it's auto-ranging, and it will sort this out on its own.
Black Lead to COM, Red Lead to VΩmA: Getting the Ports Right
Every meter has a port labeled COM, almost always the center or left socket. The black lead goes there, always, for every measurement you'll ever take. The red lead goes into the port labeled VΩmA (some meters split this differently, but the V is what you're matching).
The port you must avoid is the one marked 10A or 20A. That's a near-zero-resistance path meant for current measurements, and connecting it across a battery creates a dead short. Best case, you pop the meter's internal fuse.
We've covered what that high-amp socket does separately, and battery voltage testing never needs it.
Give each lead a gentle tug after inserting it. A half-seated lead is the most common cause of a jumpy, unstable reading.
Before You Touch the Battery: Killing Surface Charge and Prepping the Terminals
A battery fresh off a drive lies to you. Charging leaves a temporary skin of voltage on the plates called surface charge, and it can inflate your reading by 0.3 to 0.5 volts. A worn-out battery can fake a healthy 12.6V for an hour after you park.
The fix is patience or a shortcut:
- Best option: test first thing in the morning, before the car starts. Overnight rest gives you a true open circuit voltage.
- Minimum: let the car sit at least one hour after driving.
- In a hurry: turn the headlights on for 30 to 60 seconds with the engine off, switch them off, wait two minutes, then test. The small load burns off the surface charge.
While you wait, look at the terminals. White, green, or blue crusty powder is corrosion, and it acts like a resistor between your probe and the post. Scrub it off with a wire brush and a paste of baking soda and water, then dry everything before testing.
Two last prep points. Make sure the ignition is off and the doors are closed, because a lit dome light pulls the reading down slightly. And if the posts wear felt washers or plastic covers, slide them clear so your probe tips touch bare metal.
Step-by-Step: Testing Resting Voltage at the Battery Posts
This is the core test, the one that answers "is my battery charged?" Run it with the engine off after the surface charge has dissipated.
- Set the dial to DC volts (20V range on a manual meter).
- Confirm black lead in COM, red lead in the V port.
- Press the red probe tip firmly onto the positive post.
- Press the black probe tip onto the negative post.
- Hold both steady for two to three seconds.
- Read the number once it stops moving.
That's the whole test. If you've never held probes before, our walkthrough for your first session with a meter covers grip and technique in more detail.
Where Exactly to Place the Red and Black Probes
Aim for the lead post itself, not the clamp bolt or the cable end. The post gives you the battery's true voltage. Touching the clamp can fold any corrosion between clamp and post into your reading and make a good battery look tired.
Press hard enough to bite through any invisible oxide film, a firm push rather than a light tap. If the number jumps around, drag the probe tip a few millimeters across the metal to scratch through to a clean contact. Alligator clip attachments make this easier if your hands are busy.
On many BMW, Mercedes, and other European cars, the battery hides in the trunk or under a seat. Use the jump-start posts under the hood instead. They connect directly to the battery and read the same.
What You'll See on the Screen (Including Negative Numbers and Weird Auto-Ranging Flickers)
A healthy reading looks like 12.62 or 12.48, two digits after the decimal. Here's what the odd displays mean:
- A negative number like -12.6: you've reversed the probes. The magnitude is still accurate. Swap the probes and the minus sign disappears. Nothing is damaged.
- Numbers flickering through strange values: normal on auto-ranging meters, which hunt for the right scale for a second before settling. Our guide to meters that pick their own range explains the behavior.
- A reading like 0.126 with a small "m": the meter settled on millivolts because of poor probe contact. Press harder on clean metal.
- OL or 1 on the far left: on a manual meter, your selected range is too low. Move up to 20V.
Once the display holds steady, that number is your battery's state of charge in disguise. The next section translates it, and if you want the deeper background on why the standard 12-volt figure is really 12.6, we've unpacked that separately.
Car Battery Voltage Chart: What Your Reading Actually Means
Voltage maps to state of charge with surprising precision. A lead-acid battery is six 2.1-volt cells in series, which is why 12.6V means full, not 12.0V. If you're curious about the chemistry, our look at the six cells under the lid shows exactly where those numbers come from.
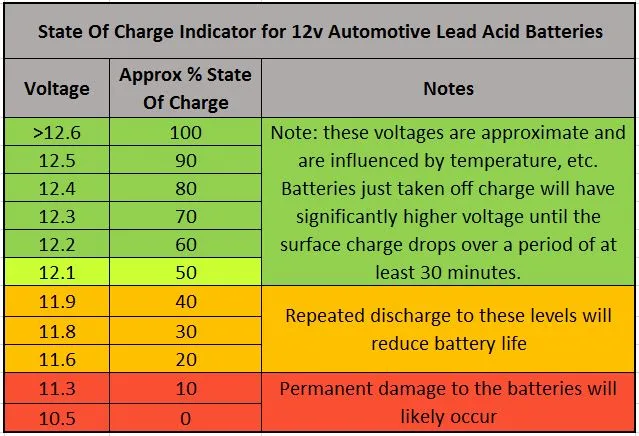
Here's the translation table for a standard flooded battery at rest, around 70°F:
| Resting Voltage | State of Charge | What to Do |
|---|---|---|
| 12.6V or higher | 100% | Nothing. It's healthy. |
| 12.4V | ~75% | Fine, but drive it or top up with a charger. |
| 12.2V | ~50% | Charge it, then find out why it drained. |
| 12.0V | ~25% | Charge immediately. Sulfation risk. |
| Below 11.9V | Discharged | Charge and test. May not recover. |
| Below 10.5V | Dead cell likely | Replace the battery. |
Two readings deserve extra attention. A battery stuck around 10.5V after a full charge almost always has a shorted cell, because you're seeing five cells' worth of voltage instead of six. No charger fixes that.
And a battery that reads 12.6V today but was flat last week isn't proven healthy. Voltage shows charge level, not capacity. A worn battery can hold a full charge and still lack the muscle to spin a cold engine, which is exactly why the next test exists.
The Cranking Test: Catching a Weak Battery That Passes the Resting Test
The cranking test measures voltage while the starter motor hammers the battery with a 100 to 200 amp load. It's the closest a multimeter gets to a true load test, and it exposes tired batteries that ace the resting check.
You'll want a helper for this one. Here's the flow:
- Set the meter to DC volts, probes on the posts, same as before.
- Note the resting reading.
- Have your helper crank the engine while you watch the display.
- Track the lowest number during cranking.
A healthy battery stays above roughly 9.6V during the crank at around 70°F. That threshold traces back to SAE load-testing conventions, and it drops slightly in cold weather. A dip to 10.5V is strong.
A plunge to 8V, with the dash lights dimming and the starter dragging, means the battery can't deliver current anymore.
If your meter has a Min/Max button, press it before cranking. The meter captures the lowest instantaneous voltage for you, which beats trying to eyeball a fast-moving display.
One caveat: this test flags weak current delivery, but it can't measure cold cranking amps directly. Rated CCA requires a conductance or carbon-pile tester. Our explainer on that cold-weather rating covers why the number on the battery label matters when you shop for a replacement.
A battery that rests at 12.6V but craters below 9.6V under cranking is worn out internally. Charge it, retest once, and if it fails again, replace it before it strands you.
Testing With the Engine Running: Is It the Battery or the Alternator?
This test settles the classic dead-battery argument in thirty seconds. With the engine idling, the alternator should hold the system between 13.5 and 14.7 volts at the battery posts.
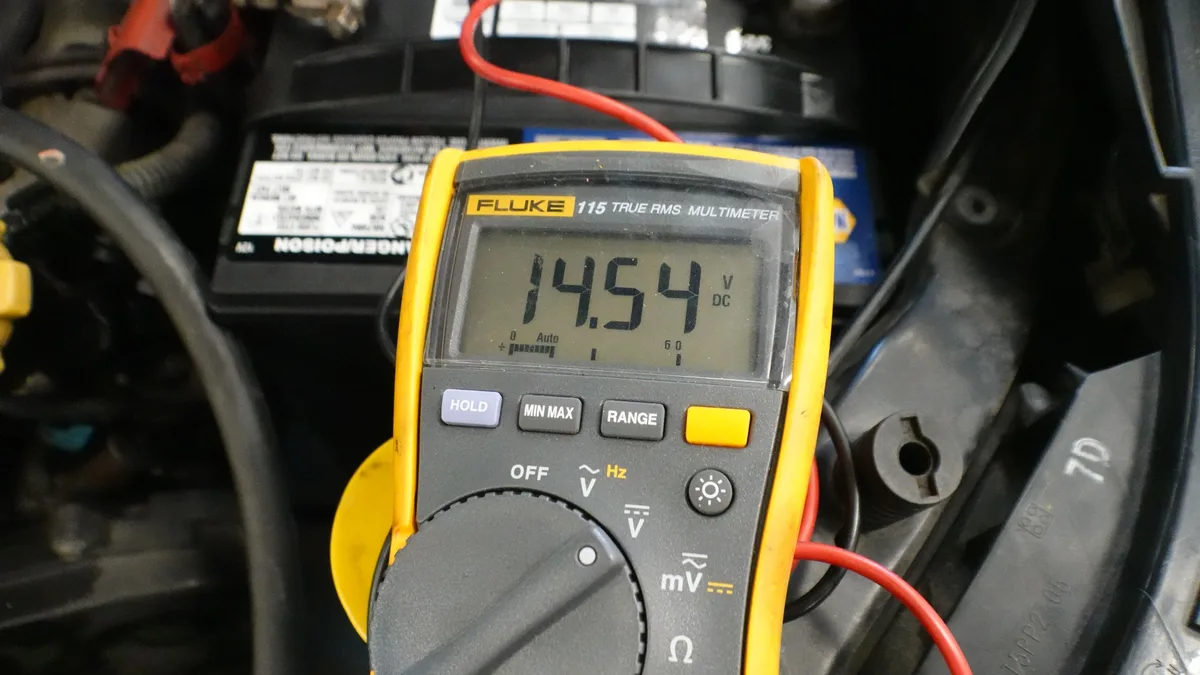
Start the car and repeat the exact probe placement from the resting test. Keep your hands, leads, and sleeves well clear of the belt and cooling fan. Then read the display:
- 13.5 to 14.7V: charging system is healthy. If batteries keep dying anyway, suspect a parasitic drain or short trips that never fully recharge it.
- Below 13.0V: the alternator isn't charging properly. Could be the alternator itself, a slipping belt, or a corroded ground strap.
- Above 15.0V: the voltage regulator is overcharging. This cooks batteries and can damage electronics. Get it fixed promptly.
Now add load. Switch on the headlights, rear defroster, and blower fan at full blast, then read again. A healthy system sags a little but holds above roughly 13.0V.
If voltage collapses toward 12V with accessories on, the alternator can't keep up with real-world demand.
Here's the decision logic in plain terms. If resting voltage was low but running voltage is normal, the battery is the suspect. If resting voltage was fine but running voltage is low, the alternator is the suspect.
If both are low, charge the battery fully and retest, because a deeply drained battery can drag readings down everywhere.
Modern stop-start cars complicate this slightly. Smart charging systems deliberately vary voltage, sometimes dipping to 12.8V or spiking past 15V by design. If your car has stop-start, watch the reading for a full minute and judge the range, not one snapshot.
Common Mistakes That Ruin the Test (or Your Meter)
Almost every bad battery diagnosis traces back to one of a handful of errors. Our research across owner forums and aggregate user reviews shows the same ones repeating endlessly:
- Testing right after a drive. Surface charge inflates the reading. You'll call a dying battery healthy and get stranded a week later.
- Dial set to AC volts. The wavy-line V reads near zero on a battery. People see 0.00 and assume the battery is completely dead.
- Measuring amps across the terminals. This is the one that costs money. With the red lead in the 10A port, the meter becomes a dead short. The fuse pops instantly, and we've broken down why that fuse blows in detail.
- Probing the clamps instead of the posts. Corrosion between clamp and post hides in your reading. You'll condemn a good battery when the real fix is a five-minute terminal cleaning.
- Testing with the doors open. Dome lights and door-ajar modules pull the voltage down a tenth or two. Small, but enough to blur the line between 75% and 50% charged.
- Trusting one resting number. A full charge doesn't prove capacity. Always follow a suspicious history with a cranking test.
- Judging cold thresholds by warm-weather rules. At 0°F, a battery delivers far less current, and cranking voltage runs lower. Don't condemn a battery on a single frigid morning without retesting after a full charge.
If a reading makes no sense, stop and re-check three things in order: dial position, lead ports, probe contact. Ninety percent of weird readings die at one of those checkpoints. Our beginner guide to making sense of the display covers the rest.
Safety First: Sparks, Hydrogen Gas, and Why the Amps Setting Is Off-Limits
A 12V battery can't shock you through dry skin, but it can hurt you three other ways. It stores enough current to weld metal, it vents flammable gas, and it's full of sulfuric acid. Workplace guidance from OSHA treats charging areas as hydrogen hazards for good reason.
The rules are short and worth following every time:
- No sparks, flames, or smoking near the battery. A charging or recently charged battery vents hydrogen. A spark at the wrong moment can rupture the case and spray acid.
- Take off rings, watches, and metal bracelets. A ring bridging the positive post to ground carries hundreds of amps through metal wrapped around your finger. Burns from this are severe.
- Never let a wrench or probe bridge both posts. That's a direct short. Expect a loud pop, molten metal spatter, and a scared jump backward.
- Keep the meter off the amps setting for battery posts. Voltage mode has high internal resistance and is safe by design. Current mode is a short circuit waiting for a battery.
- Wear eye protection around flooded batteries. The caps can weep electrolyte, and a rupture throws acid. Glasses cost less than an ER visit.
- Stand clear during cranking tests. Don't lean your face over the battery while the starter pulls max current.
- Wash your hands afterward. Battery posts carry lead residue. NIOSH guidance on lead exposure applies even to casual contact.
None of this should scare you off. Millions of drivers run these tests safely every year. The hazards are real but narrow, and every one of them is avoided by the habits above.
Multimeter vs Battery Tester vs Free Parts-Store Test: When Each Makes Sense
A multimeter is the best value for routine checks, but it isn't the only option. Each tool answers a slightly different question, and knowing which is which saves you money and misdiagnoses.
| Method | Cost | What It Measures | Best For |
|---|---|---|---|
| Multimeter | $15 to $50 | Voltage (charge state, cranking sag, alternator output) | Regular DIY checks and battery-vs-alternator calls |
| Conductance tester | $30 to $100 | Internal health, estimated CCA | Judging remaining battery life |
| Carbon-pile load tester | $50 to $150 | Voltage under a fixed heavy load | Shops and heavy-duty batteries |
| Free parts-store test | $0 | Conductance, printed report | A second opinion before buying |
The multimeter wins on versatility. It tests the battery, the alternator, fuses, grounds, and half the electrical gremlins a car can throw at you. Its one blind spot is capacity, because voltage alone can't tell you how many cranking amps remain.
A conductance tester fills that gap. It estimates CCA against the label rating, so it can tell you a battery is at 60% health even while voltage looks perfect. If your battery is past year four, that estimate matters, and our data on typical service life explains why age four is the tipping point.
The free parts-store test is genuinely useful, with one caution. The counter has an incentive to sell batteries, so treat a borderline "replace" verdict as a data point, not a command. Run your own resting and cranking tests first, then let the store's printout confirm or contradict your numbers.
Testing AGM, Stop-Start, and Trunk-Mounted Batteries: What Changes
The method stays identical, but the numbers and access points shift. Get these details wrong and you'll misjudge a perfectly healthy battery.
AGM batteries run higher. A fully charged AGM rests around 12.8 to 13.0V instead of 12.6V. So an AGM reading 12.5V isn't full, it's closer to 75%. The glass-mat construction that makes these batteries spill-proof also gives them that higher resting voltage.
EFB batteries sit in between. Stop-start cars in the UK and EU often carry an enhanced flooded battery rather than a full AGM. Their resting voltage tracks close to standard flooded numbers, and our breakdown of the enhanced flooded design covers how they differ. Not sure what's in your car?
The label says, or you can work through the main chemistry options to identify it.
Stop-start systems fake alternator problems. Smart regulators deliberately let voltage drift between roughly 12.5V and 15V to save fuel. Watch the running-voltage reading for a full minute before judging it, and don't panic over a momentary 12.9V at idle.
Trunk and under-seat batteries need the jump posts. As mentioned earlier, use the remote posts under the hood. One extra wrinkle: some cars route the remote positive through a fuse. If the jump posts read wildly different from expectations, test at the battery itself before drawing conclusions.
Battery management systems add one more caution. On many modern cars, the BMS monitors the negative terminal through a sensor. Always probe the posts or jump points, never clamp accessories between the sensor and the body, or you can confuse the system.
Expert Tips From the Driveway: Reading Between the Numbers
The steps get you a number. These habits, pulled from decades of collective mechanic wisdom and our research across technician forums, get you the right conclusion.
- Test on a schedule, not just in a crisis. A reading every month, plus before winter and summer road trips, builds a baseline. A battery that slides from 12.65V to 12.45V resting over three months is telling you something.
- Write the readings on the battery. A paint marker note with the date and voltage turns your next test into a trend line instead of a guess.
- Heat kills, cold reveals. Summer heat degrades the plates all year, then the first cold snap exposes the damage. That's why batteries "die" in November after being wounded in July.
- Chase the half-volt. If the posts read 12.6V but the cable ends read 12.1V during cranking, you've found voltage drop across corrosion. Clean the connections before buying anything.
- Recheck after a full charge. A battery found at 12.0V isn't condemned yet. Charge it overnight, let it rest two hours, then retest. If it can't hold 12.4V, it's done.
- Mind the clock on parked cars. A healthy battery self-discharges slowly, but modern cars draw power constantly. A car parked three weeks can drop half a volt with nothing wrong at all.
- Match the replacement properly. When a battery does fail, voltage testing can't spec the new one. Size, terminals, and ratings come from your vehicle's fitment requirements, not from the meter.
FAQs About Testing a Car Battery With a Multimeter
What setting should a multimeter be on to test a car battery?
Set the dial to DC volts, shown as a V with a straight line over a dashed line. On a manual-ranging meter, choose the 20V range. Auto-ranging meters need only the DCV position.
Never use AC volts, ohms, or any amps setting for a terminal-to-terminal battery test.
What voltage means a car battery is bad?
A resting reading below 10.5V after a full charge usually means a dead cell, so replace the battery. Readings between 11.9V and 12.4V mean it's discharged but possibly recoverable. The real condemnation test is cranking voltage.
If it drops below 9.6V while starting, the battery is worn out.
Can I test a car battery without removing it?
Yes, and you should. Every test in this guide happens with the battery installed and cables connected. Just make sure the ignition is off and doors are closed for resting tests.
Removal only becomes necessary for bench charging, terminal repairs, or replacement.
Is 12.4 volts okay for a car battery?
A resting 12.4V equals about 75% charged, which starts a car fine in mild weather. It's not ideal long term, because lead-acid batteries sulfate when kept below full charge. Drive it for 30+ minutes or connect a maintainer, then confirm it holds 12.6V.
For AGM batteries, 12.4V is closer to half charged.
Why does my multimeter show a negative voltage on the battery?
Your probes are reversed, with red on the negative post and black on the positive. The number itself is still accurate, just displayed with a minus sign. Swap the probes and it reads normally.
Nothing is damaged, and this is the most harmless mistake you can make.
Can a multimeter measure cold cranking amps?
No. CCA is a load rating that requires a conductance or carbon-pile tester to estimate. A multimeter shows voltage, which reveals charge state and cranking sag but not amp capacity.
The cranking voltage test is the closest substitute, since a battery that holds above 9.6V is delivering current well.
Your Quick Reference Card: Every Reading and What to Do Next
Everything in this guide condenses to one card. Screenshot this table and keep it with your meter.
| Reading | Condition | Your Move |
|---|---|---|
| 12.6 to 12.8V resting | Fully charged | You're done. Retest monthly. |
| 12.4V resting | 75% charged | Drive or charge, then retest. |
| 12.0 to 12.2V resting | Half charged or less | Charge overnight, find the cause. |
| Below 10.5V resting | Dead cell | Replace the battery. |
| Above 9.6V cranking | Strong under load | Battery is healthy. |
| Below 9.6V cranking | Weak under load | Charge, retest once, then replace. |
| 13.5 to 14.7V running | Charging normally | System is healthy. |
| Below 13.0V running | Undercharging | Check belt, grounds, alternator. |
| Above 15.0V running | Overcharging | Fix the regulator promptly. |
Remember the AGM offset: add roughly 0.2V to the resting thresholds. And remember the golden sequence: rest the car, set DC volts, red to positive, black to negative, read, interpret.
That's the whole skill. A $20 meter, three tests, and the voltage chart turn a mystery no-start into a clear answer. The first time you correctly call a failing alternator before it strands you, or skip an unnecessary $180 battery because the real problem was a corroded clamp, the meter pays for itself many times over.

Similar Posts