How to Read a Multimeter: A Beginner’s Guide
Staring at a multimeter with two dangling probes and a dial full of odd symbols feels intimidating. But learning how to read a multimeter for beginners really comes down to three things: the dial, the ports, and the numbers on the screen. Get those right, and you can test a battery, a wall outlet, or a blown fuse in seconds.
A multimeter measures voltage, current, and resistance, the three core electrical values you'll ever need. Most beginner meters built to the IEC 61010 safety standard show readings on a digital display with a 2000 or 6000 count. As of 2026, a solid entry-level model runs about $15 to $40.
Let's start with what those readings actually mean.
Quick Answer
To read a multimeter, plug the black probe into the COM jack. Put the red probe in the VΩmA jack. Turn the dial to your function, like DC volts.
Touch the two probe tips to your test points. Read the number and its unit on the screen.

What a Multimeter Actually Tells You (Volts, Amps, Ohms)
A multimeter answers three questions about a circuit. How much electrical pressure is there? How much current is flowing?
And how much resistance is in the path? Those map to volts, amps, and ohms.
Voltage is the push. It's the difference in electrical potential between two points, measured in volts (V). A healthy AA battery reads about 1.5V.
A car battery at rest should sit near 12.6V. If you want to know what a specific number means, our breakdown of what a 12.4V reading says about battery health puts it in plain terms.
Current is the flow. It's the rate electrons move through the circuit, measured in amps (A) or milliamps (mA). Resistance is the pushback, measured in ohms (Ω).
These three units are defined by measurement bodies like the National Institute of Standards and Technology, so your meter reads against a real standard.
Here's the quick version:
| Measurement | Unit | What it tells you | Everyday example |
|---|---|---|---|
| Voltage | Volts (V) | Electrical pressure | Battery or outlet health |
| Current | Amps / mA | Flow of electricity | Parasitic drain on a car |
| Resistance | Ohms (Ω) | Opposition to flow | A good vs broken wire |
Most beginner tasks only need voltage and continuity. You'll reach for current and resistance less often, but it's good to know they're there.
Why You Really Need to See the Dial, Ports, and Probes
Reading a multimeter is a visual skill first. You're matching a symbol on the dial to a jack on the body, then watching where the number lands on screen. A wall of text can't teach that the way a clear photo can.
Picture the front of the meter. There's a big rotary knob in the center, ringed by symbols. Below it sit two or three round holes, the input jacks.
Two wires, one red and one black, plug into those jacks.
The most common beginner error is a mismatch between these parts. People leave the red probe in the current jack, then try to measure voltage. That one slip can blow the meter's internal fuse.
So before any measurement, your eyes confirm two things. The dial points at the right symbol, and the red probe sits in the right hole. That's why the next few sections lean on photos.
The Parts of a Multimeter You'll Touch Every Time
Every multimeter, cheap or premium, shares the same core parts. Learn these four and the rest is just extra features. Let's walk through each one the way you'd actually use it.
The Rotary Dial and Its Symbols
The rotary dial is the selector knob in the middle. You turn it to pick what you're measuring. Each position matches a symbol, like V for volts or Ω for ohms.
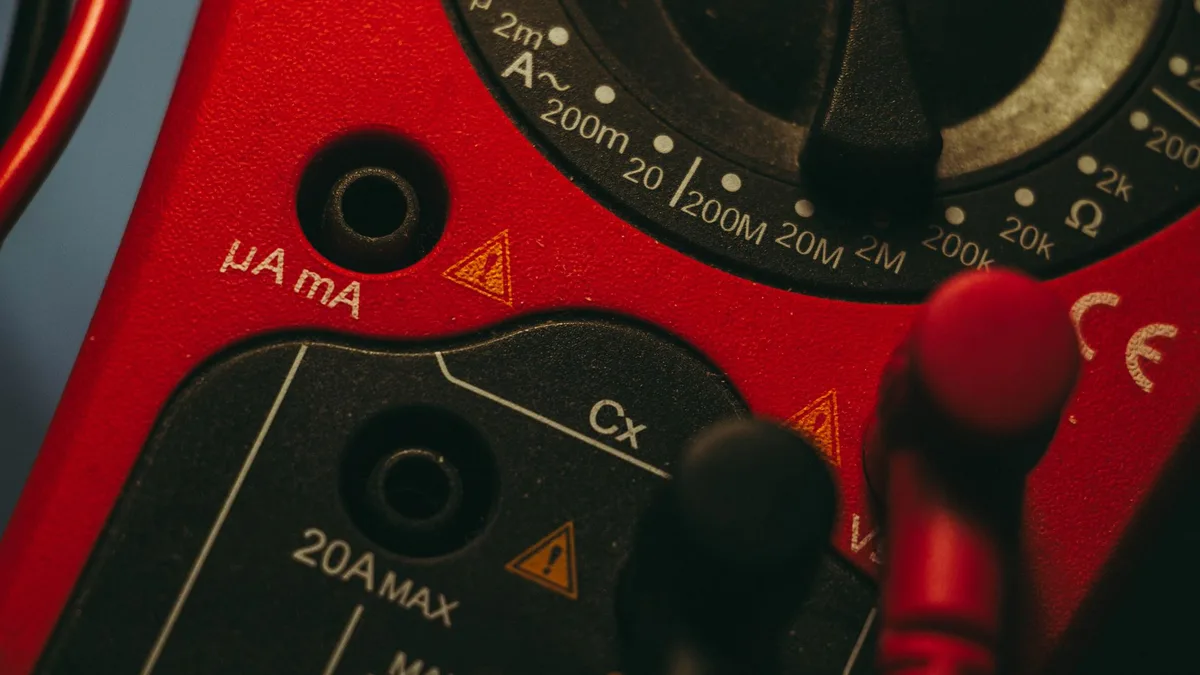
On a manual-ranging meter, the dial also has numbers under each symbol, like 20 or 200 under DC volts. Those set the range, the highest value that position can read. An auto-ranging meter skips the numbers and picks the range for itself.
If you mostly test 12V car batteries, the 20V DC position is your friend. Our short guide on dialing in the 20V DC setting shows exactly where the knob should point.
The Three Input Jacks (COM, VΩmA, 10A)
The input jacks are the round holes where the probes plug in. Most meters have three, and the labels tell you everything.
- COM: the common jack. The black probe lives here, always. It's your return path for every measurement.
- VΩmA: handles voltage, resistance, and small currents. The red probe stays here for almost everything a beginner does.
- 10A (sometimes 20A): only for measuring large currents. Move the red probe here just for that job, then move it back.
Leaving the red probe in the 10A jack while measuring voltage is the classic fuse-killer. When in doubt, red goes in the middle VΩmA hole.
Red and Black Probes: Which Goes Where
The probes are the two test leads with pointed metal tips. Red is positive, black is negative or common. Black always goes in the COM jack, no exceptions.
For readings, you touch the tips to two points in the circuit. On a battery, red goes to the positive terminal and black to the negative. If you swap them by accident, the number just shows a minus sign.
It's a handy way to spot reversed polarity. If you'd rather skip the meter entirely, there are a few no-tool battery checks worth knowing too.
Multimeter Symbols Decoded: DC, AC, Ω, Continuity, and Diode
The dial symbols look like hieroglyphics until someone decodes them. Once you know a handful, the whole meter opens up. Here are the ones you'll actually use.
| Symbol | What it means | When you'll use it |
|---|---|---|
| V with a straight line and dots (V⎓) | DC voltage | Batteries, car systems, electronics |
| V with a wavy line (V⏦ or V~) | AC voltage | Wall outlets, mains power |
| Ω | Resistance in ohms | Testing a wire or component |
| Speaker or sound-wave icon | Continuity | Checking a fuse or cable for a break |
| Arrow into a bar (▷|) | Diode test | Checking diodes and some sensors |
| A / mA | Current in amps | Measuring draw or drain |
The DC versus AC distinction trips up almost everyone at first. Anything with a battery is DC. Anything from the wall is AC.
Pick the wrong one and your reading will be wildly off or read zero.
For car work, DC volts is your default. If you're unsure which position to land on, our rundown on the right meter setting for a car battery clears it up in a minute. The continuity setting is the other beginner favorite, since it beeps when a path is unbroken.
How to Read the Display: Numbers, Decimal Points, and "OL"
The display shows your answer, but a few quirks confuse newcomers. Learn what the number, the decimal point, and the letters mean, and you'll never misread a result.
Start with the plain number. Whatever the dial points at is the unit. So 12.6 on DC volts means 12.6 volts.
Watch the decimal point closely, because 1.5 and 15.0 are very different batteries.
Now the odd ones:
- OL or a lone "1" on the left: overload or open. On resistance or continuity, it usually means no connection or a broken path.
- A minus sign (-): your probes are reversed. Flip them, or just read the number and ignore the sign.
- A jumpy, unstable number: normal on auto-range for a second, then it settles. If it never settles, check your probe contact.
A reading of 0.00V is its own puzzle. On a battery that should show 12V, zero often points to a dead cell or a bad connection. Our fix-it walkthrough for a flat zero on a car battery covers what to check next.
And if the battery reads full voltage but still won't crank, that odd 12V-but-no-start situation has its own causes.
Digital vs Analog vs Auto-Ranging: Which Reads Easier for Beginners
For most beginners, a digital auto-ranging multimeter is the easiest to read. It shows a clear number on screen and picks the range for you. No guessing, no needle to interpret.
Here's how the three common types stack up:
| Type | How you read it | Best for |
|---|---|---|
| Digital manual-range | Number on screen, you set the range | Learning the fundamentals |
| Digital auto-range | Number on screen, range is automatic | Beginners and quick checks |
| Analog | Needle over a printed scale | Watching trends and dips live |
Analog meters use a moving needle instead of a display. They're great for spotting a slow voltage drop, but reading the scale takes practice. Digital wins on clarity for everyday testing.
If your meter is manual-range, one rule saves you grief. When you don't know the value, start on the highest range and step down. That protects the meter from an overload.
How to Measure DC Voltage (Test a AA or Car Battery)
DC voltage is the measurement you'll use most, and it's the simplest. Black probe in COM, red probe in VΩmA, dial to V with the straight line. Then touch the probes to the two terminals.

For a AA battery, touch red to the flat positive end and black to the spring side. A healthy cell reads about 1.5V. Below 1.3V, it's tired.
For a car battery, set the dial to 20V DC so 12.6V fits inside the range. Red to the positive post, black to the negative. Our guide on what a resting number should be helps you judge the result.
If the reading sags hard the moment you crank, that starting-voltage dip points to a weak battery or bad connection.
Want to know if the alternator is doing its job? Start the engine and watch the number climb. A charging system should read somewhere in the mid-14V band.
Anything stuck at battery voltage means the alternator isn't feeding it.
How to Measure AC Voltage at a Wall Outlet
AC voltage testing checks live mains power, so treat it with respect. Set the dial to V with the wavy line, not the straight one. In the US, an outlet reads about 120V.
In the UK and most of Europe, expect around 230V.
Keep both hands behind the probe guards and touch only the plastic grips. Insert the red and black tips into the two vertical slots of the outlet. Order doesn't matter for AC, since it has no fixed polarity.
A reading near 120V or 230V means the outlet is live and healthy. A reading of zero suggests a tripped breaker or a dead circuit. If your meter isn't rated for the job, don't force it.

Similar Posts