How to Read a Multimeter to Test Your Car Battery
A car battery that reads 12.6 volts or higher on a multimeter is fully charged and healthy. Anything under 12.2 volts means trouble is brewing, and under 12.0 volts means the battery is running on empty. Learning how to read a multimeter for a car battery takes about five minutes, and it can save you from a no-start morning or a battery you didn't actually need to buy.
The catch is that the numbers only mean something if you test correctly. Per Battery Council International state-of-charge tables, the gap between "fully charged" and "half dead" is just 0.4 volts, so small mistakes in setup produce big misreadings. Let's start with the quick version, then walk through every step in detail.
Quick Answer
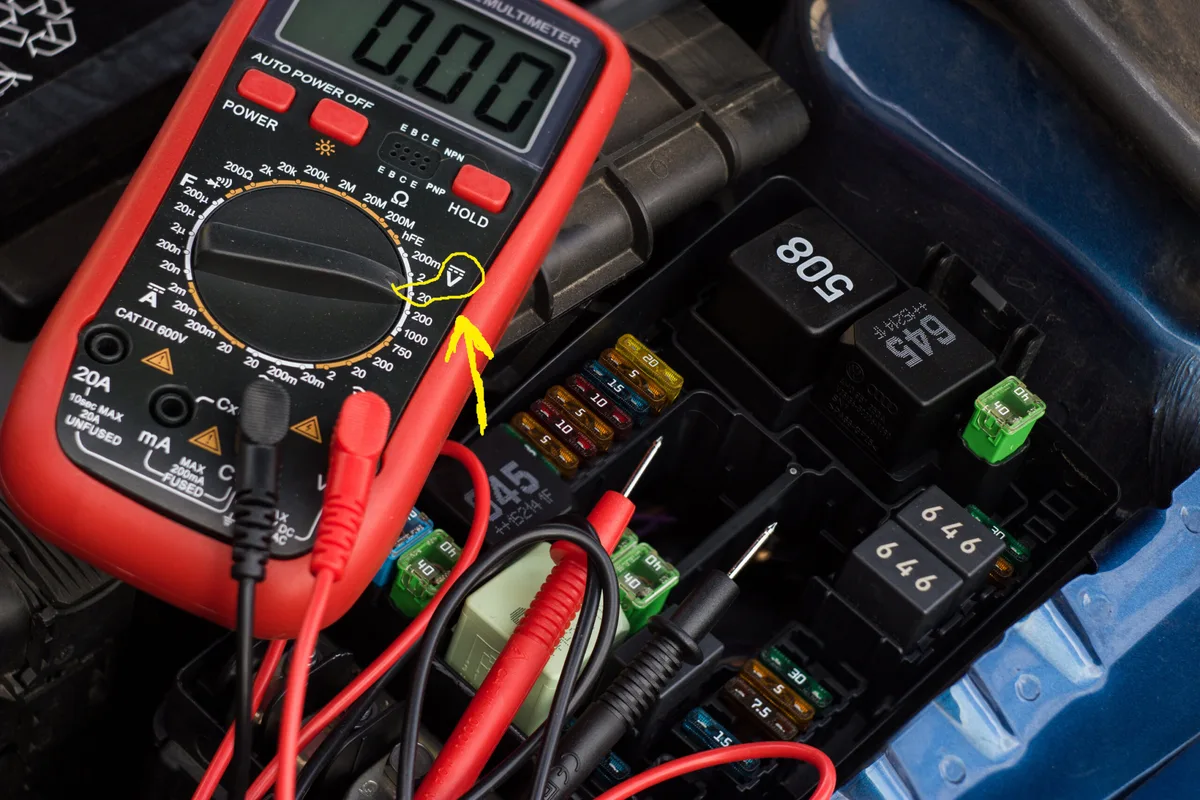
To read a multimeter for a car battery, set the dial to 20V DC. Plug the black lead into COM and the red lead into VΩmA. Touch red to the positive post and black to the negative post.
A healthy resting battery reads 12.6 volts or more. Below 12.2 volts, recharge it. Below 10.5 volts, the battery likely has a dead cell.
Why a Multimeter Beats Guessing (and What It Can't Tell You)
Slow cranking, dim headlights, and a clicking starter all point vaguely at the battery. A multimeter replaces that guesswork with a number. In our research, the most common misdiagnosis in DIY battery work is replacing a good battery when the real problem was the alternator or a corroded connection.
A voltage test settles that in minutes. It tells you the battery's state of charge, whether the charging system is doing its job, and whether voltage collapses when the starter kicks in. A basic digital multimeter costs $15 to $40 as of 2026, less than a single shop diagnostic fee.
Be honest about the limits, though. A resting voltage test measures charge, not capacity. A worn-out battery can read a beautiful 12.6 volts with no load and still fold the moment you crank the engine.
That's why this guide covers the cranking test too, not just the parked reading. If you want the deeper background on how the battery actually works inside the case, it helps explain why voltage and capacity aren't the same thing.
Getting to Know Your Multimeter: The Dial, Ports, and Symbols That Matter
Every multimeter test on a car battery uses exactly one function: DC voltage. The trouble is that the dial is crowded with symbols, and picking the wrong one gives you either a useless reading or a blown fuse. Manufacturer manuals from Fluke and other major brands use the same core symbol set, so once you learn it, it transfers to any meter.
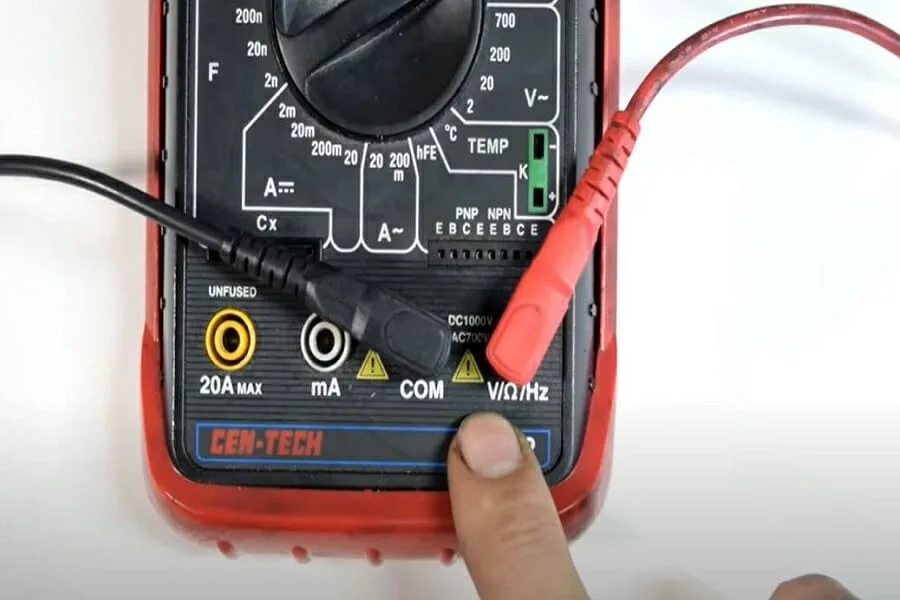
Finding the DC Voltage Setting (and the Symbols That Trip People Up)
The DC voltage setting is marked with a V next to a solid line over a dashed line. That's the one you want. Some meters print it as DCV or V⎓ instead.
We've covered what that DCV marking means in detail if your dial looks different from the photos here.
The trap is the AC voltage setting. It's marked with a V next to a wavy line (V~), and it sits right beside the DC setting on most dials. Set the meter to AC and touch a car battery, and you'll see zero or nonsense.
Car batteries are DC only.
Two more settings to actively avoid:
- A or 10A (amps): never use this across battery terminals. It creates a dead short and will pop the meter's fuse instantly, or worse.
- Ω (ohms): resistance mode is for unpowered circuits, not a live battery.
If your dial has markings you don't recognize, a quick pass through every symbol you'll meet on a typical meter clears it up fast.
Where the Red and Black Leads Actually Plug In
The black lead always goes into the port marked COM. That's the common ground and it never moves. The red lead goes into the port marked VΩmA (sometimes just V), which handles voltage, resistance, and small currents.
Most meters have a third port marked 10A or 20A. Leave it alone for battery testing. It's built for high-current measurements, and plugging the red lead there while touching battery posts is the classic way people end up wondering why the meter's fuse blew.
One last dial note. Manual-ranging meters make you pick a range, and 20V DC is correct for a 12V battery. Auto-ranging meters find the range themselves.
If yours only says V⎓ with no numbers, you likely have a meter that picks its own range, and you can just select DC voltage and go.
Before You Test: Setting Up the Car and Battery for an Accurate Reading
The number one cause of misleading battery readings isn't the meter. It's testing at the wrong time. For a true resting voltage (technically called open-circuit voltage), the car needs to sit with the engine off for at least one hour.
Overnight is better.
Here's your pre-test checklist:
- Engine off, key out of the ignition
- Headlights, interior lights, and accessories off
- Doors closed (open doors keep interior electronics awake)
- Phone chargers and dash cams unplugged
- Battery terminals reasonably clean, no heavy white or green crust
That last point matters more than people think. Corrosion between the post and the clamp can shave real voltage off your reading. If the posts look crusty, disconnect the battery (negative first), clean the posts and clamps with a wire brush and baking soda paste, reconnect (positive first), and then test.
Also worth knowing: battery chemistry changes the "full" number slightly. A standard flooded battery reads about 12.6V full, while an AGM design typically reads 12.8V to 13.0V when topped up. Stop-start cars often run AGM or enhanced flooded batteries, so check what's in your car before judging the number.
Why Surface Charge Lies, and How to Get Rid of It
Surface charge is a temporary voltage boost that sits on the battery plates right after driving or charging. Test five minutes after a highway drive and a tired battery can read 12.8V or higher. That number is a lie, and it fades within hours.
If you can't wait overnight, burn the surface charge off manually:
- Turn the headlights on for 30 to 60 seconds with the engine off.
- Turn them off.
- Wait two to three minutes for the voltage to settle.
- Test.
This one habit fixes the most common false "my battery is fine" result we see in aggregate DIY reports.
How to Test Your Car Battery Step by Step
Everything is set up. The actual test takes under a minute. If you've never held a multimeter before, our walkthrough on using a meter for the first time covers general handling, but here's the battery-specific version.
Step 1: Set the Dial to 20V DC
Turn the dial to the DC voltage setting. On a manual-ranging meter, choose the 20V position. That range covers everything a 12V battery can throw at it, from a dead 8 volts to a charging 14.7 volts.
Don't pick the 2V range. A 12.6V battery exceeds it, and the screen will show "1" or "OL" (overload). That display isn't a dead battery.
It's the meter telling you the range is too small.
Step 2: Place the Probes on the Battery Posts
Touch the red probe to the positive post, marked with a + and often covered by a red cap. Touch the black probe to the negative post, marked with a −. Press firmly against bare metal, on the posts themselves rather than the clamps if you can reach them.
Testing at the posts skips any corrosion hiding between post and clamp, so you measure the battery itself. Swap the probes by accident and you'll see a negative number like -12.6V. No harm done.
The magnitude is still correct, just flip the probes.
Step 3: Read the Display
A digital meter settles within a second or two. You're looking for a steady number with two decimal places, something like 12.64. Write it down.
Quick interpretation before the full chart: 12.6V or above means fully charged. 12.4V means roughly 75% and worth watching. 12.2V or below means recharge now. A wildly jumpy display usually means poor probe contact, so reseat the tips and hold steady.
That's the core skill. The next section turns your number into a verdict, because a 12 volt battery that actually reads 12.0 volts is far less healthy than the name suggests.
Car Battery Voltage Chart: What Every Reading Means
Here's the chart that turns your reading into a decision. These numbers assume a standard flooded battery, rested, at around 70°F.
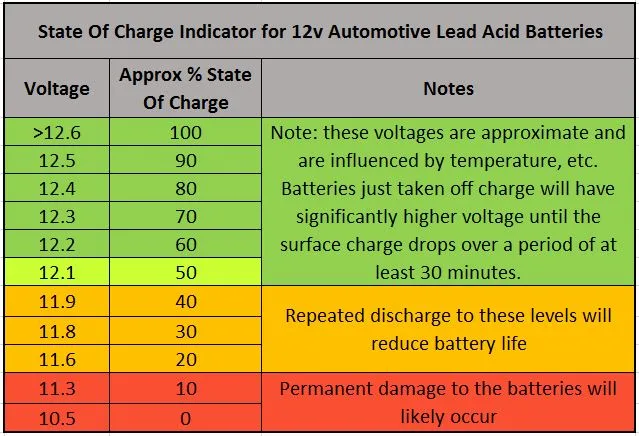
| Resting Voltage | State of Charge | What It Means | Action |
|---|---|---|---|
| 12.6V or higher | 100% | Healthy and fully charged | Nothing, retest seasonally |
| 12.4V | ~75% | Slightly low, not yet a problem | Take a longer drive, retest |
| 12.2V | ~50% | Half discharged, sulfation risk | Recharge soon |
| 12.0V | ~25% | Deeply discharged | Recharge now, investigate cause |
| 11.9V or lower | ~0% | Effectively flat | Recharge and load test |
| Below 10.5V | Damaged | Likely a dead cell | Replace |
The scale surprises people because it's so compressed. The entire usable range of the battery lives between 12.6 and 11.9 volts. A reading of 12.0 sounds close to full, but it's actually a battery running near empty.
The chemistry explains why. A 12V battery is six cells in series at about 2.1 volts each, which is why "full" is 12.6 rather than 12.0. There's a closer look at the plates and cells inside if you want to see where those six cells physically sit.
Two adjustments before you judge your number. AGM batteries read about 0.2V higher across the board, so 12.8V is their "full." Cold weather also drags readings down slightly, so a 12.4V reading on a freezing morning is less alarming than the same number in July.
Is 12.4 Volts Enough to Start a Car?
Usually yes, but it's a warning sign rather than a passing grade. At 12.4V the battery holds roughly 75% charge, and most starters will still spin fine. The problem is what the number tells you about the trend.
A battery that never gets back to 12.6V despite regular driving is either aging out or fighting a weak charging system. Recharge it fully with a plug-in charger, let it rest overnight, and retest. If it can't hold 12.6V after that, its days are numbered.
The Cranking Test: Why a Good Resting Voltage Can Still Fool You
A resting voltage test measures charge, and charge is not the same as strength. An old battery can top up to 12.6V just fine, then collapse the instant the starter demands 150 amps or more. The cranking test catches exactly this failure, and it's the test that free voltage checks skip.
You'll want a helper for this one. Here's the flow:
- Keep the meter set to 20V DC, probes on the posts, same as before.
- Have your helper crank the engine while you watch the display.
- Note the lowest number that flashes during cranking.
- Compare it against 9.6 volts.
Above 9.6V during cranking (at around 70°F) means the battery delivers current under load. A dip to 10.5V or so is normal and healthy. A plunge below 9.6V means the battery can't back up its resting voltage with real power, and it's on the way out even if it started the car this time.
If your meter has a Min/Max button, press it before cranking. The meter captures the lowest instantaneous reading for you, which beats trying to eyeball a display that's changing fast.
This weakness under load is exactly what the cold cranking amps rating describes. A battery that fails the cranking test on a mild day will fail harder in winter, because the CCA number on the label is measured at 0°F, and cold cuts available cranking power sharply. Keep your face away from the battery while your helper cranks, and keep probes steady on the posts.
Testing the Alternator While You're at It: The Engine-Running Check
You already have the meter out, so spend sixty more seconds and test the charging system. This single check separates "my battery keeps dying" from "my alternator is quietly killing my battery." The two problems look identical from the driver's seat.
Start the engine and let it idle. Put the probes back on the posts, red to positive, black to negative, meter still on 20V DC. The reading should now jump above the resting voltage.
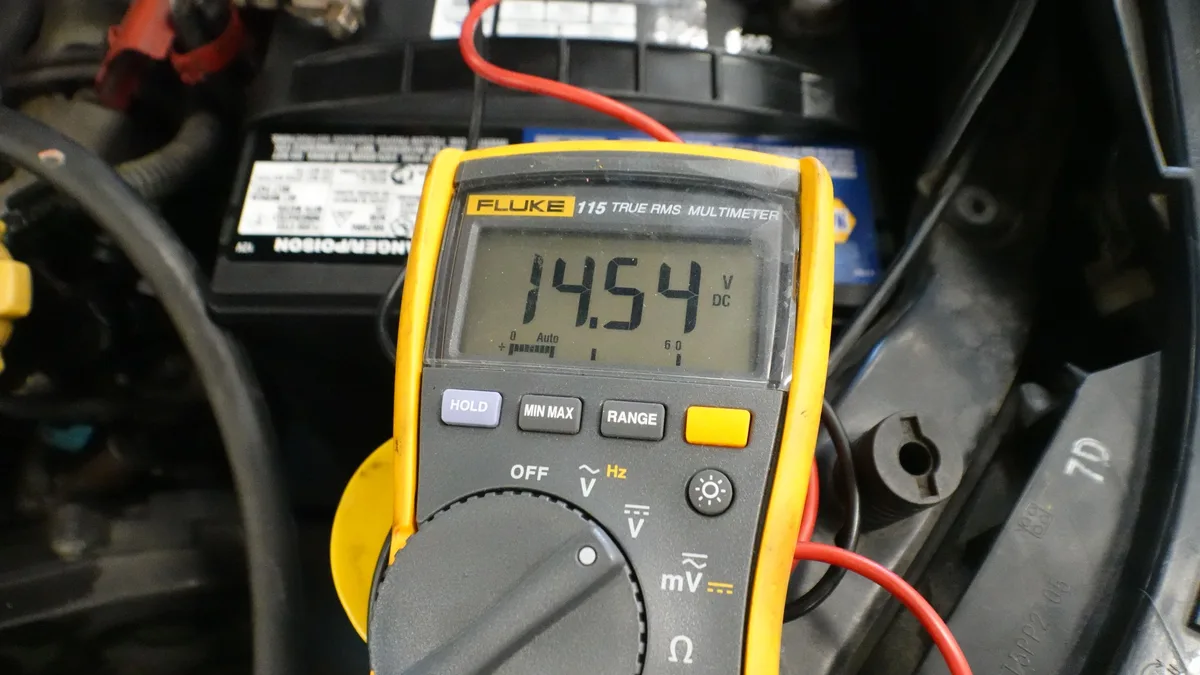
Here's how to score what you see:

Similar Posts