How to Set a Multimeter to Test Your Car Battery
You've popped the hood, you've got a multimeter in hand, and now you're staring at a dial covered in symbols that look like ancient runes. Figuring out how to set multimeter for car battery testing is genuinely the hardest part of the whole job. The test itself takes about 30 seconds once the dial is right.
Here's the good news. In our research across dozens of meter manuals and manufacturer guides, the setting is nearly identical on every meter sold as of 2026: DC voltage, 20V range on manual meters. A healthy resting battery should show 12.4 to 12.6 volts on the screen.
Before we get to the numbers, though, let's lock in the setting itself.

Quick Answer
To set a multimeter for a car battery, turn the dial to DC voltage. On a manual-ranging meter, pick the 20V position. On an auto-ranging meter, select V with the solid and dashed line.
Plug the black lead into COM and the red lead into the VΩ jack. Touch red to the positive post and black to the negative post. A healthy resting battery reads 12.4 to 12.6 volts.
Why the Dial Trips Everyone Up (And What Those Symbols Actually Mean)
The dial confuses people because meter makers use symbols instead of words. There's no position labeled "car battery." Instead, you get a circle of cryptic marks, and two of them look almost identical.
Your car battery stores direct current, or DC. Wall outlets carry alternating current, or AC. Your meter tests both, so it has two voltage settings, and picking the wrong one is the single most common setup mistake we see in aggregate user feedback.

V⎓ vs V~: Spotting DC Voltage on Any Meter
The DC voltage symbol is a V with a solid line above a dashed line. The AC symbol is a V with a wavy tilde next to it. That's the entire difference, and it's easy to miss in a dim garage.
Point the dial at the solid-and-dashed V every time you test a battery. If you accidentally land on V~, the meter won't be damaged. You'll just get a nonsense reading, usually zero or a jittery number that means nothing.
Our full breakdown of the DCV position covers this marking in more detail.
DCV, V—, and Other Labels Cheap Meters Use
Budget meters often skip the symbols and print letters instead. Here's how the common labels map out:
| Label on Dial | What It Means | Use for Car Battery? |
|---|---|---|
| V⎓ or V with solid/dashed line | DC voltage | Yes |
| DCV | DC voltage | Yes |
| V~ or ACV | AC voltage | No |
| Ω | Resistance (ohms) | No |
| A or mA | Current (amps) | Never across a battery |
If your dial shows something not on this list, it's worth five minutes with a guide to every marking on the dial before you start probing. Guessing is how fuses get blown.
Auto-Ranging vs Manual-Ranging: Which Dial Are You Looking At?
You own one of two meter types, and the setting differs slightly between them. A quick look at the dial tells you which one is in your hand.
A manual-ranging meter has multiple numbers around the DC voltage section: 200m, 2, 20, 200, 600. You pick the range yourself. An auto-ranging meter has just one V position, sometimes with a SELECT or FUNC button to switch between DC and AC.
The meter picks the range for you.
Here's the rule for each:
- Manual-ranging meter: Set the dial to 20 in the DC voltage section. A car battery sits around 12.6V, so you need the smallest range that's still above your expected reading. 20V fits perfectly.
- Auto-ranging meter: Turn the dial to V and confirm the screen shows DC (the solid-and-dashed symbol). Press SELECT if it shows the AC wave instead.
Why 20 and not 200? Both will technically work. But the 20V range gives you two decimal places, like 12.63, while 200V rounds to one, like 12.6.
Battery diagnosis lives in those decimals. The difference between 12.4 and 12.2 volts is a 25% swing in charge level.
Pick 2V and you'll get an error reading instead, because 12.6 volts exceeds that range's ceiling. If you're not sure how your meter decides ranges on its own, we've explained how self-adjusting meters work separately. Fewer dial positions means fewer ways to get it wrong, which is why we generally point beginners toward auto-ranging models.
Where the Probes Go: COM, VΩ, and the Jack That Blows Fuses
The bottom of your meter has three ports, sometimes four, and only two of them are correct for this job. Get this wrong and the meter reads zero even with a perfect dial setting. That's the moment most people wrongly conclude their meter is broken.
Here's the correct setup:
- Black lead: into the port marked COM. This is common, or ground. It's always the black lead's home, no matter what you're testing.
- Red lead: into the port marked VΩ (often VΩmA on budget meters). This port handles voltage and resistance.
- The 10A or 20A port: leave it alone. It's for measuring high current only.
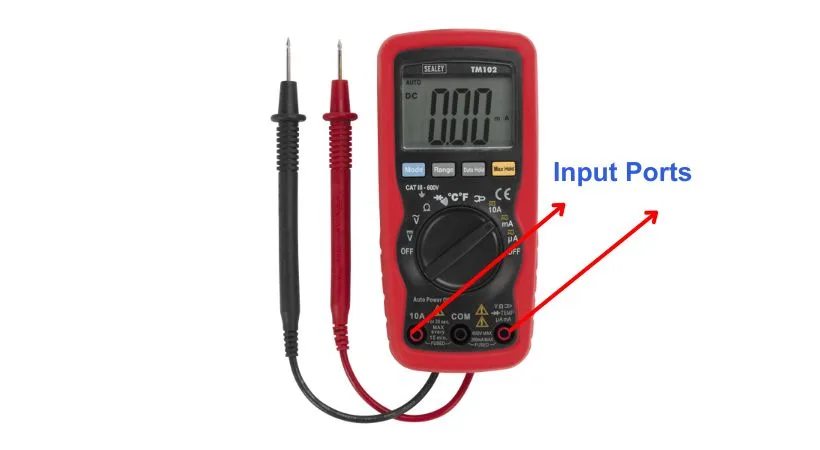
That third port deserves its own warning. If the red lead sits in the 10A jack while you probe battery posts, the meter shows nothing useful. Worse, if the dial is also set to amps, you've created a near-direct short across the battery.
The internal fuse sacrifices itself instantly. We've covered what that high-current jack does and the usual reasons behind a dead meter after testing if you've already been down that road.
Quick habit worth building: every time you pick up the meter, glance at the red lead's port before touching anything. Fluke, one of the industry's benchmark meter manufacturers, builds this check into its official training materials for exactly this reason. Their technical resources are worth a look if you want manufacturer-level depth on meter safety.
Setting Up Your Multimeter Step by Step
Everything above condenses into five steps. Total hands-on time is under a minute once the battery has rested. If this is your very first meter, our walkthrough on getting started with a meter pairs well with this sequence.
Step 1: Kill the Engine and Let the Battery Rest
Turn the engine off. Switch off headlights, cabin lights, and the radio. Unplug phone chargers.
Now wait. A battery tested right after driving carries a surface charge that inflates the reading by 0.2 to 0.6 volts. Thirty minutes of rest gives a usable number.
Overnight gives the most honest one.
Step 2: Plug In the Leads Correctly
Black into COM. Red into VΩ. Double-check the red lead isn't in the amp jack from a previous job.
This two-second glance prevents ninety percent of "my meter is broken" moments.
Step 3: Turn the Dial to DC Volts (20V on Manual Meters)
Rotate the dial to the DC voltage symbol. Manual meter: stop at 20. Auto-ranging meter: stop at V and confirm DC on the screen.
If the display shows a wavy AC symbol, press SELECT until it switches.
Step 4: Touch Red to Positive, Black to Negative
Find the positive post. It's marked with a plus sign and usually wears a red cover. Press the red probe tip firmly against bare metal on that post.
Touch the black probe to the negative post the same way.
Firm contact matters. Corrosion or a light touch produces flickering, unstable numbers. Keep both hands on the plastic probe bodies, never the metal tips.
Step 5: Read the Display
The number appears instantly. Something like 12.58 means a healthy, mostly charged battery. Jot it down, because the next section turns that number into a diagnosis.
If the digits and decimal points still feel unfamiliar, our primer on making sense of the display fills the gap.
Turn the dial to OFF when you're done. Leaving a meter on drains its internal 9V battery, and a weak meter battery causes inaccurate readings on your next test.
What Your Reading Means: The Voltage Chart That Matters
The number on the screen is a direct report on your battery's state of charge. Voltage and charge level track each other closely on a resting 12V lead-acid battery. Small differences in the decimals mean big differences in health.

Here's the chart worth memorizing, or at least screenshotting:
| Resting Voltage | State of Charge | What It Tells You |
|---|---|---|
| 12.6V or higher | 100% | Healthy and fully charged |
| 12.4V | About 75% | Fine, but worth charging soon |
| 12.2V | About 50% | Undercharged, charge it now |
| 12.0V | About 25% | Deeply discharged |
| Below 11.9V | Near dead | Possible bad cell or failed battery |
12.6V and Up: Fully Charged
A resting reading of 12.6 to 12.8 volts means your battery is full and healthy. That range surprises people who expect exactly 12 volts. A 12V battery is really six cells at about 2.1 volts each, which is why the true voltage number sits above the label.
No action needed here. Close the hood and drive.
12.0 to 12.4V: Partially Discharged
Anything in this band means the battery is low but probably salvageable. Put it on a proper charger, not just a long drive. Alternators are built to maintain charge, not restore a half-empty battery from scratch.
Recheck the resting voltage a day after charging. If it holds 12.6V, you're fine. If it sags back into the low 12s, the battery is losing its ability to hold charge.
Below 12.0V: Trouble
A reading under 12 volts signals deep discharge, and under 11.9V usually means a dead or dying cell. Lead-acid batteries suffer permanent plate damage (sulfation) when left this low. Charging might revive it temporarily, but aggregate testing data shows deeply discharged batteries fail at much higher rates within months.
If your battery is more than four years old and reads this low, replacement is the smart money. Our expected service life breakdown shows why age and deep discharge together are usually a death sentence.
AGM Batteries Read a Little Higher
AGM batteries run about 0.2 volts higher across the board. A full AGM rests at 12.8 to 13.0 volts, so a reading of 12.6V that looks perfect for a flooded battery actually means an AGM is slightly low. Check your battery label before judging the number.
If you're not sure what's under your hood, our guide to absorbed glass mat designs explains how to identify one. Start-stop vehicles often carry an enhanced flooded type instead, which reads like a standard flooded battery.
Testing With the Engine Running: Checking the Alternator Too
Same setting, same probes, engine on. This second test takes one extra minute and tells you whether the charging system is doing its job. A weak alternator kills good batteries slowly, so testing one without the other only gives you half the story.
Start the engine and let it idle. Touch the probes to the posts exactly as before, red to positive, black to negative. The number should jump well above the resting reading.
Here's how to read it:

Similar Posts