How to Test a Car Battery With a Multimeter: Easy Steps
Your car won't start, or it cranks like it's tired, and you need to know if the battery is the problem. Learning how to test a car battery with a multimeter answers that question in about ten minutes, without a shop visit. The tool does the work.
You just need to know where to put the probes and what the numbers mean.
Here's the part most guides skip: a healthy 12-volt battery actually reads 12.6 volts or higher at rest, per SAE J537 testing standards. That 0.6 volts is the entire difference between a full battery and a half-dead one. So before you touch a probe to a terminal, let's lock in the numbers you're looking for.
Quick Answer: What a Healthy Car Battery Should Read
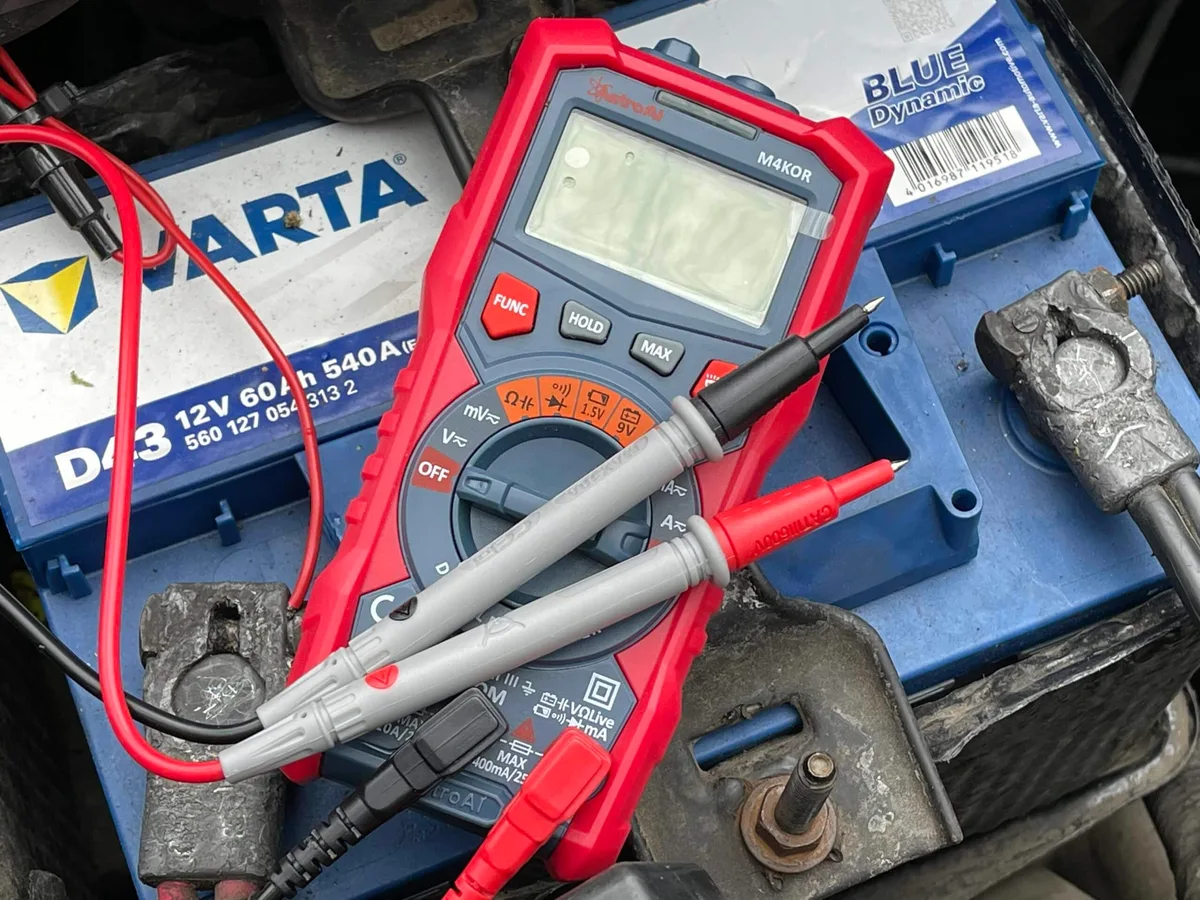
Set your multimeter to DC volts on the 20V range. Touch the red probe to the positive terminal. Touch the black probe to the negative terminal.
A healthy battery reads 12.6 volts or higher with the engine off. Below 12.2 volts means recharge it. Below 9.6 volts while cranking means replace it.
That's the whole test in miniature. The rest of this guide covers the details that make your reading trustworthy, because a rushed test lies to you more often than it tells the truth.
Why a Multimeter Beats Guessing (and What It Can't Tell You)
The old folk methods are vague. Watching your headlights dim during cranking tells you something is weak, but not what. A multimeter puts a hard number on the battery's state of charge, and numbers don't argue.
It also lets you split three separate problems apart in one driveway session:
- Battery problem: low resting voltage, or a big voltage drop while cranking
- Charging problem: engine running but voltage stuck below 13.5 volts
- Parasitic drain: battery tests fine, then mysteriously dies overnight
That's real money. In our research, a replacement battery runs $100 to $250 as of 2026, and plenty of people buy one when the actual fault was a lazy alternator. A $20 meter prevents that mistake.
One honest limit, though. A multimeter measures voltage, not capacity. A battery can show a lovely 12.6 volts at rest and still collapse under the load of a starter motor, because voltage and cold cranking amps are two different measurements.
That's exactly why this guide includes a cranking test and not just a resting one.
What You Need Before You Start
The kit for this job is short. You likely own most of it already.
| Item | What It's For | Rough Cost |
|---|---|---|
| Digital multimeter | Reading voltage at the terminals | $15 to $100+ |
| Wire brush or terminal cleaner | Scrubbing corrosion off the posts | $5 to $10 |
| Baking soda and water | Neutralizing acid crust before cleaning | Pantry staple |
| Safety glasses and gloves | Protection from acid and sparks | $10 to $15 |
| A helper (optional) | Cranking the engine while you watch the meter | Free |
Any digital multimeter works for this. A $15 budget meter and a $100 Fluke will both read a car battery accurately enough to make the right call. If you've never held one before, it's worth a quick primer on getting comfortable with the tool so the dial doesn't feel like alien technology.
You'll also want to find your battery first. Most sit in the engine bay, but plenty of modern cars hide them in the trunk or under the rear seat. Your owner's manual settles it in thirty seconds.
One prep step matters more than people think. Corroded terminals throw off readings, so if the posts wear a white or blue-green crust, scrub them clean before testing. A fuzzy connection can make a good battery look sick.
Setting Up Your Multimeter: Dial, Range, and Probe Ports
This is where most first-timers stall, and honestly, it's the fault of the meter, not the person. Multimeter dials are crowded with symbols. You only need one of them today.
Look for the V with a solid line over a dashed line. That's DC voltage, sometimes labeled DCV or V⎓, and it's the setting for anything battery-powered. If the symbols still look like hieroglyphics, our breakdown of what each dial marking means decodes the whole face.
Skip the V with the wavy line. That's AC voltage, for wall outlets, and it will show you nonsense on a battery.
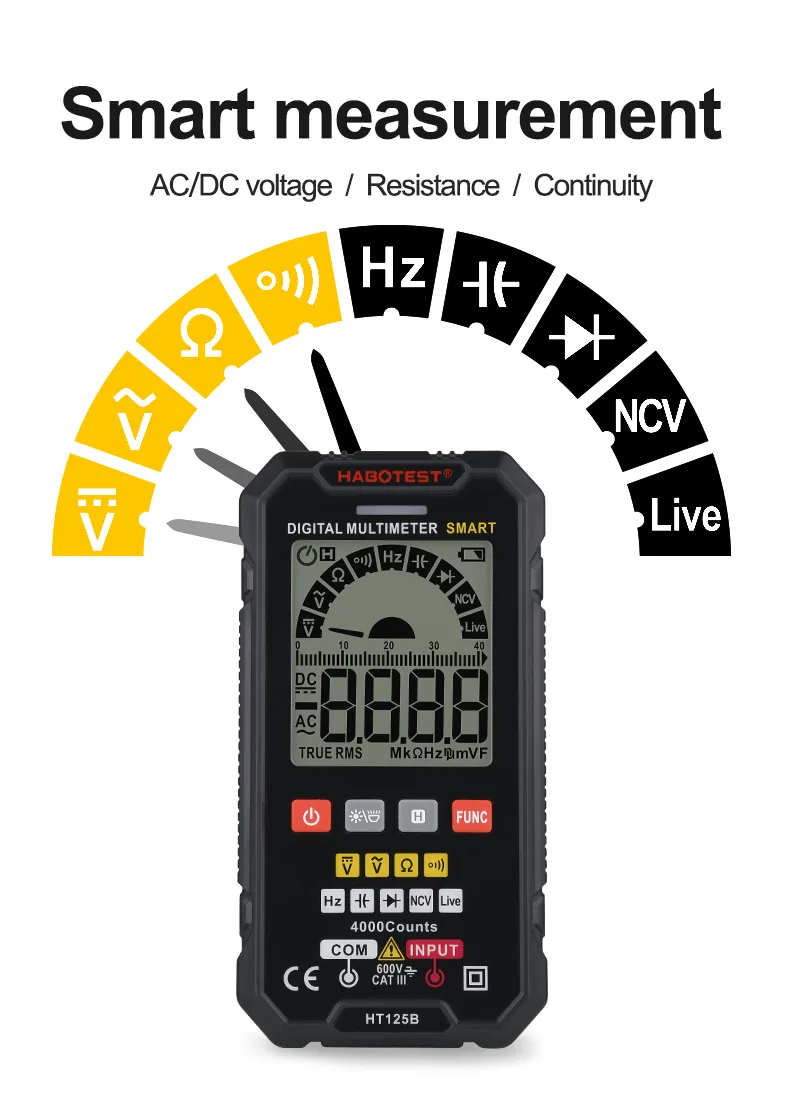
Now the probes. Plug the black lead into the port marked COM. Plug the red lead into the port marked VΩmA.
Do not use the 10A port for this test. That port is for high-current measurements, and using it wrong is the classic way people blow the internal fuse on a brand-new meter.
Manual-Ranging Meters: Why You Pick the 20V DC Setting
Pick 20V because it's the smallest range that still fits a car battery's voltage. Manual meters make you choose a ceiling. The 2V range is too small, so the display just shows "1" or "OL" for overload.
The 200V range works but drops precision, showing "12.6" at best.
The 20V range gives you two decimal places, like 12.64. You need that resolution, because the difference between a good and mediocre battery lives in those decimals. Our guide to the DC voltage function goes deeper on why the range matters.
Auto-Ranging Meters: What the Display Does While It Settles
An auto-ranging meter picks the range for you, so the dial just says V⎓ with no numbers. Turn it there and touch the probes to the battery. The display may flicker through a few values for a second or two before it settles.
That's normal behavior, not a fault.
Wait for the number to hold steady before you trust it. If you're unsure which style you own, this explainer on self-adjusting meters shows how to tell at a glance. Either style ends up at the same reading.
Auto-ranging just saves you a dial decision.
Step 1: Kill the Surface Charge So Your Reading Isn't a Lie
Test a battery right after driving and it will lie to you. The alternator leaves a thin skim of extra voltage sitting on the battery plates, called surface charge. It can push a tired battery up to 12.8 volts or more, which reads as perfectly healthy.
That surface charge isn't real usable energy. It bleeds off within hours, and the battery sags back to its true resting voltage. Testing too soon is the single most common reason people misdiagnose a failing battery as fine.
You have two ways to clear it:
- The patient way: let the car sit with the engine off for at least 4 hours. Overnight is better. First thing in the morning, before anyone starts the car, is the gold-standard moment to test.
- The fast way: turn the headlights on for 1 to 2 minutes, then switch them off. Wait another 2 minutes for the voltage to stabilize, then test.
Either works. The overnight method is more accurate, and it doubles as a soft drain test. A battery that reads 12.6 volts at bedtime and 12.1 volts by morning is telling you something, either about its own health or about a parasitic draw somewhere in the car.
Also make sure the car is fully asleep before you measure. Close the doors, kill the interior lights, and pull any phone chargers. Even a dome light pulls enough current to nudge your reading downward.
A true open-circuit voltage means nothing is sipping from the battery while you measure, which is the number every state-of-charge benchmark is built on.
Step 2: Test Resting Voltage at the Terminals
With the surface charge gone, you're ready for the real measurement. Engine off, key out of the ignition, meter set to 20V DC.
Take the reading at the battery posts themselves, not the cable clamps. Metal-to-metal contact on the actual lead posts skips past any corrosion hiding between clamp and post. Press each probe tip firmly against its post and hold it steady for a few seconds.
Watch the display settle on a number. You want the stable figure, not the first flicker. If the digits keep wandering, check your probe pressure and make sure the tips are touching clean metal.
If numbers on a meter screen still feel cryptic, our walkthrough on making sense of the display covers every quirk.
Where Exactly to Put the Red and Black Probes
Red probe on the positive post, black probe on the negative post. The positive post is marked with a plus sign and usually wears a red plastic cover. The negative post has a minus sign and is often bare or covered in black.
On top-post batteries, touch the probe tips to the lead posts directly. On side-post batteries, touch the small terminal bolt heads instead. Keep each probe on its own terminal.
Never let a probe, wrench, or anything metal bridge both posts at once, because that's a direct short with real spark potential.
What If the Reading Shows a Negative Number?
A negative reading like -12.6 just means your probes are swapped. The battery is fine, and so is your meter. Digital multimeters simply report polarity, so reversed probes flip the sign.
Swap the probes to the correct posts and the number turns positive. Ignore the minus sign for interpretation purposes. A -12.6 reading tells you the same story as 12.6.
Car Battery Voltage Chart: What Every Reading Means
Now match your number to reality. These benchmarks apply to a standard flooded 12-volt battery at roughly room temperature, after sitting overnight.
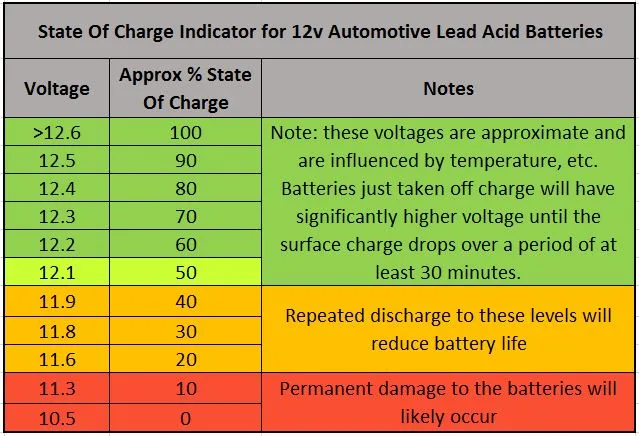
| Resting Voltage | State of Charge | What to Do |
|---|---|---|
| 12.6V or higher | 100% | Healthy. Move on to the cranking test. |
| 12.4V | ~75% | Usable, but charge it soon. |
| 12.2V | ~50% | Recharge now. Don't just drive it around. |
| 12.0V | ~25% | Deeply discharged. Charge and retest. |
| 11.9V or below | Effectively dead | Charge fully, retest, and expect sulfation damage. |
| ~10.5V | Dead cell likely | Replace the battery. Charging won't fix it. |
Two of these rows deserve extra attention. First, the jump from 12.6 to 12.2 volts looks tiny but represents losing half the battery's charge. The scale is compressed, so small decimal changes carry big meaning.
Second, that 10.5-volt row is a fingerprint. A 12-volt battery is really six 2.1-volt cells wired in series, which is why the internal construction matters here. When one cell shorts out, you lose its 2.1 volts and land near 10.5.
No charger resurrects a shorted cell.
Temperature nudges these numbers too. A cold morning can pull a healthy battery's reading down a tenth of a volt or so. That's normal chemistry, not failure, though cold also cuts the battery's actual cranking power at the same time.
One more caution from earlier: a good resting number is necessary but not sufficient. Plenty of batteries pass this test and fail the next one. Don't skip Step 3.
Step 3: The Cranking Test That Catches a Weak Battery Under Load
This is the test that separates "reads fine" from "actually works." A starter motor yanks 100 to 200 amps out of the battery, and that load exposes weakness that resting voltage hides. It's the closest a multimeter gets to a true load test.
You'll want a helper for this one. Here's the sequence:
- Leave the probes on the battery posts, red to positive, black to negative.
- Have your helper crank the engine while you watch the meter display.
- Note the lowest voltage shown during those few seconds of cranking.
- Let the engine start, or stop cranking after 10 seconds max.
The pass line sits at 9.6 volts during cranking, measured around 70°F. That threshold traces back to industry load-test standards published by SAE International, the body that defines how batteries get rated. A healthy battery typically dips to somewhere between 10 and 11 volts and bounces right back.
If the voltage plunges below 9.6, the battery can't hold itself together under load. If it crashes toward 6 or 7 volts, the battery is finished, full stop. This is exactly the battery that strands you at the grocery store despite "testing fine" at rest.

Similar Posts