Skip to content

How to Check Battery Voltage With a Multimeter

·18 min read·by
how to check battery voltage with multimeter

Battery reads fine one minute, car won't start the next. If you've ever stood there guessing, learning how to check battery voltage with multimeter probes in hand is the fastest way to stop guessing and start knowing. The whole test takes about 30 seconds once you understand what the dial, the probes, and the display are telling you.

Here's the thing our research keeps confirming: most beginner failures aren't technique problems, they're reading problems. A fully charged 12V car battery should show 12.6 volts or higher at rest, per Battery Council International state-of-charge references. Miss the DC symbol by one dial click and you'll get nonsense instead.

So let's start with the fast version, then fix the reading problem for good.
how to check battery voltage with multimeter

Quick Answer: The 30-Second Voltage Check

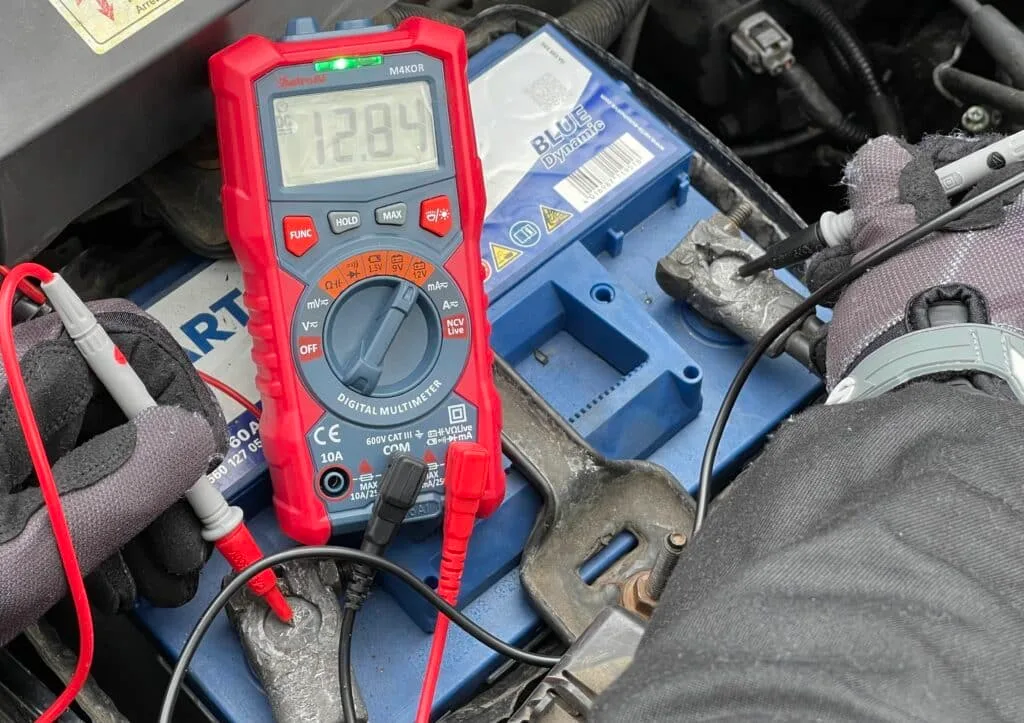
To check battery voltage with a multimeter, set the dial to DC volts. On a manual meter, pick the 20V range for a car battery. Plug the black lead into COM and the red lead into VΩ.

Touch red to the positive terminal and black to the negative. A healthy 12V car battery reads 12.6V or higher at rest.

How to test a Battery with a Multimetervia alwaysafix

Why Reading Your Multimeter Wrong Is the #1 Beginner Problem

The steps are easy. The symbols are not. Aggregate user feedback on budget multimeters shows the same complaints over and over: "my battery reads 0.02," "the screen just says 1," "I got a negative number." Every one of those is a reading or setup error, not a broken meter.

A multimeter dial packs a dozen functions into one small circle. The DC voltage symbol sits one click away from AC voltage, and on some meters it sits right next to resistance. Point the dial at the wrong one and the meter happily measures the wrong thing.

It won't warn you.

That's why this guide leans hard on what you'll actually see: the exact symbol shapes, what the display shows when something's off, and what a correct reading looks like. Get the visual identification right and the rest is just touching two probes to two terminals.

Know Your Multimeter First: Dial Symbols, Jacks, and Probes

Spend two minutes here and every battery test for the rest of your life gets easier. Whether you own a $15 hardware store meter or a Fluke, the layout follows the same logic. There's a rotary dial for choosing the function, jacks at the bottom for the leads, and two probes: red for positive, black for negative.

DC voltage symbol multimeter dial

The DC Voltage Symbol vs the AC Symbol (Don't Mix These Up)

Batteries produce direct current, so you want DC volts every single time. Look for a V with a solid line over a dashed line next to it (V⎓). Some meters print it as VDC or DCV.

If you're unsure what your specific dial marking means, this breakdown of that dial setting clears it up quickly.

The one to avoid is V with a wavy line (V~). That's AC voltage, meant for wall outlets. Put an AC-set meter on a battery and you'll see zero or a jittery garbage number.

Nothing breaks, but the reading is meaningless.

Here's the visual shorthand:

  • V⎓ (straight line over dashes): DC volts. Use this for every battery.
  • V~ (wavy line): AC volts. Outlets only, never batteries.
  • Ω (horseshoe): Resistance. Never use on a live battery.
  • A or mA: Current. Skip it for voltage checks entirely.

If your dial has markings you can't place, a full symbol-by-symbol walkthrough is worth bookmarking before you test anything.

Where the Red and Black Leads Actually Plug In

Black lead goes into the jack marked COM, always. Red goes into the jack marked VΩ or VΩmA. Those two positions handle every voltage test you'll ever run.

Most meters have a third jack marked 10A or 20A. Leave it alone for battery voltage work. Plugging the red lead there and touching a battery creates a near-direct short through the meter.

Best case, you blow the internal fuse. Worst case on a car battery, you get sparks and a ruined meter. If that's already happened to you, here's why that fuse pops and how to avoid a repeat.

Auto-Ranging vs Manual-Ranging: What Your Dial Should Point To

An auto-ranging meter has one DC volts position. Turn the dial there and the meter picks the correct range itself. Most meters sold as of 2026, even in the $20 to $30 bracket, are auto-ranging.

If you're not sure which type you own, the giveaway is the dial: one setting per function means auto-ranging, multiple numbers per function means manual.

Manual-ranging meters make you choose. The rule: pick the lowest range that's still above your expected voltage.

Battery TypeExpected VoltageManual Range to Select
Car battery (12V)12.0 to 12.9V20V
9V battery8 to 9.6V20V
AA, AAA, C, D1.2 to 1.6V2V
CR2032 coin cell2.8 to 3.3V20V (or 4V if offered)
Li-ion cell (18650)3.0 to 4.2V20V

Pick a range below the battery's voltage and the display shows "1" or "OL." Pick one way above it and you lose decimal precision. The 20V setting is the workhorse for automotive jobs.

How to Check a Car Battery's Voltage, Step by Step

Everything below applies to standard flooded lead-acid batteries plus AGM designs and EFB variants. The process is identical. Only the "full charge" number shifts slightly, which we'll cover in the interpretation section.

Step 1: Let the Battery Rest (Surface Charge Will Lie to You)

Test a battery right after driving and it can read 13.0V or more. That's surface charge, a temporary voltage boost sitting on the battery plates after charging. It fades on its own but it makes a mediocre battery look great.

Let the car sit with the engine off for at least 30 minutes. Overnight is better. If you can't wait, turn the headlights on for two minutes, switch them off, wait another minute, then test.

That burns off the surface charge and gets you an honest resting number.

Step 2: Set the Dial to 20V DC

Turn the dial to the V⎓ position. On a manual-ranging meter, click to 20 in the DC volts section. On an auto-ranging meter, the single DC volts position is all you need.

Quick sanity check before you probe anything: touch the two probe tips together. The display should read 0.00 or very close. If it won't settle at zero with tips touching, your meter's own 9V battery is probably dying.

Step 3: Probe Placement Comes Down to Red on Positive, Black on Negative

Pop the hood and find the battery terminals. The positive post has a + mark, often a red cover. The negative post has a − mark and usually a black clamp.

If corrosion is caked on, scrape a clean metal contact point first. White or green crust between probe and post drops your reading.

Press the red probe firmly onto the positive post. Press the black probe onto the negative post. Metal to metal, solid pressure.

You don't need to remove the cable clamps for a basic voltage check. And relax about probe order: touching them in reverse just flips the sign on the display. Nothing sparks, nothing breaks.

Step 4: Read the Display and Compare It to the Chart

The number settles within a second or two. A resting reading between 12.0 and 12.9 volts means you did everything right mechanically. Now the real skill kicks in: knowing what that number actually means.

If the digits themselves confuse you, decimals and all, this primer on making sense of the display fills the gap.

What Your Car Battery Reading Actually Means

A voltage reading is a fuel gauge, not a health report. It tells you how charged the battery is right now. Here's how to translate the number.
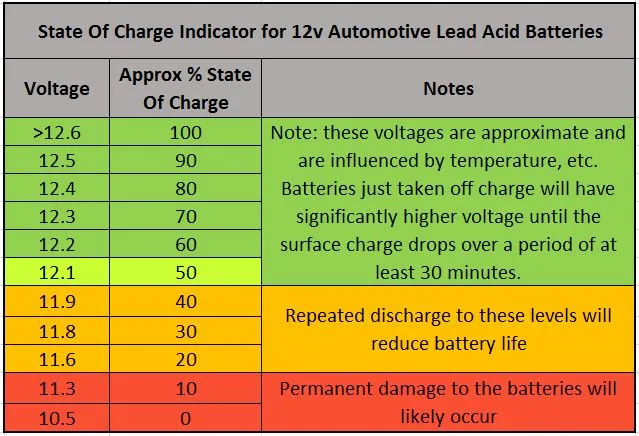
12V battery state of charge chart

The 12V State-of-Charge Chart (12.6V to Dead)

A "12-volt" battery almost never reads exactly 12.0V. That's actually a warning number, as the chart shows. These figures align with Battery Council International references for flooded lead-acid batteries at rest.

Resting VoltageState of ChargeWhat It Means
12.6V or higher100%Healthy and fully charged
12.4V~75%Usable, but charge it soon
12.2V~50%Undercharged, recharge now
12.0V~25%Deeply discharged, damage risk
Below 11.9VDischargedLikely sulfated, may not recover

Two adjustments worth knowing. AGM batteries run slightly higher, reading about 12.8 to 12.9V at full charge. Cold weather also pulls readings down a tenth or two, so a 12.5V reading on a freezing morning is better news than it looks.

For deeper context on why 12.6V became the magic number, the chemistry behind that resting figure is worth five minutes.

Testing With the Engine Running: Checking Your Alternator

Same setup, engine on. Now you're testing the charging system instead of the battery. With the engine idling, a healthy alternator pushes the reading up to between 13.5 and 14.7 volts.

Below 13.5V running means the alternator isn't charging properly. Above 15V means the voltage regulator is overcharging, which cooks batteries. Either way, the battery may be an innocent victim.

Replacing it won't fix a charging system fault. Manufacturer guidance from Fluke recommends checking both resting and running voltage before condemning any battery, and that two-reading habit will save you real money.

The Cranking Test: Why 12.4V Can Still Leave You Stranded

Resting voltage can look decent while the battery fails the only test that matters: starting the engine. For this one, have a helper crank the engine while you watch the display.

During cranking, voltage should stay above roughly 9.6 volts. If it plunges to 8V or lower, the battery can't deliver current under load even though it holds a surface-level charge. That collapse under demand ties directly to the battery's cold-start delivery rating, and it's the classic signature of an aging battery.

A battery that reads 12.4V at rest but craters while cranking is telling you its time is almost up.

Testing Household Batteries: AA, AAA, 9V, and Coin Cells

Same principle, smaller targets. Set the dial to DC volts and pick the 2V range on a manual meter for AA, AAA, C, and D cells. Auto-ranging meters need no adjustment at all.
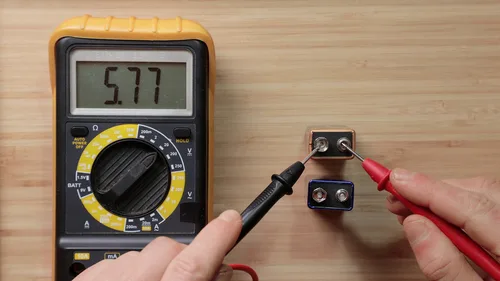
testing AA battery with multimeter

Probe Placement on Small Batteries (It's Fiddlier Than It Looks)

On a AA or AAA, the button top is positive and the flat base is negative. Press the red probe tip against the button and the black tip against the flat end. Small cells like to skitter away under probe pressure, so brace the battery against a table edge or hold it in your fist with one end exposed.

A 9V battery breaks the pattern because both terminals sit on top. The smaller round post is positive, the larger hexagonal clip is negative. Coin cells like the CR2032 are the easiest of all: the flat face marked with a + is positive, the opposite face is negative.

Pinch it between the two probe tips like a coin.

Voltage Cutoffs: When to Toss and When to Keep

A dead alkaline battery can still show a surprisingly normal number with no load on it. That's why the cutoffs below run higher than you'd expect. Energizer and Duracell datasheets treat an alkaline cell as spent well before it hits zero.

BatteryFresh ReadingReplace Below
AA / AAA alkaline1.5 to 1.6V1.3V
NiMH rechargeable1.3 to 1.4V charged1.0V (recharge)
9V alkaline9.0 to 9.6V8.4V
CR2032 coin cell3.0 to 3.3V2.8V

The 9V cutoff matters more than most. Smoke detectors start chirping around 8.4V, so a 9V reading 8.5V goes in the drawer for a toy, not back into the detector. An alkaline AA reading 1.35V will still run a TV remote for months, but it'll die fast in a high-drain device like a flashlight or camera flash.

Testing Lithium-Ion and Rechargeable Batteries

Lithium-ion cells follow the same probe routine but a completely different voltage scale. A single Li-ion cell (an 18650, a vape cell, a drone cell) reads 4.2V fully charged, about 3.7V at mid-charge, and 3.0V empty. Below 2.5V, the cell chemistry itself starts taking damage, and many chargers will refuse to revive it.

Power tool packs are just Li-ion cells in series. A "20V max" pack is five cells, so a full pack reads around 20 to 21V and an empty one around 15V. Divide your reading by the cell count and you get per-cell voltage, which tells you far more than the sticker rating does.

Two cautions specific to lithium. First, never probe a swollen, dented, or punctured lithium battery. A damaged cell can vent or ignite, and the EPA maintains guidance on safe disposal rather than testing.

Second, a Li-ion cell reading 0V isn't just empty. Its protection circuit has likely tripped or the cell has failed, and force-charging it is a fire risk.

NiMH rechargeables (the 1.2V AA-shaped kind) are more forgiving. They read about 1.4V hot off the charger, settle to 1.2 to 1.3V in use, and want a recharge at 1.0V. Don't judge them by alkaline standards.

A NiMH showing 1.25V is healthy, not half-dead.

Readings That Confuse Beginners (And What They Really Mean)

Almost every "broken multimeter" complaint in aggregate user reviews traces back to one of three displays. Here's the decode for each.

A Negative Number Like -12.6V

Your probes are swapped, and that's the whole story. Red is on the negative terminal and black is on the positive. The magnitude of the number is still perfectly accurate, so -12.6V means a fully charged battery.

Digital meters shrug this off completely. Flip the probes if the minus sign bothers you, or just read the number and ignore the sign. Only old analog needle meters actually mind reversed polarity, since the needle slams the wrong way against its stop.

"OL" or a Stuck "1" on the Display

The meter is telling you the voltage exceeds the range you selected. This only happens on manual-ranging meters. Testing a 12V car battery on the 2V range gives you "OL" (overload) or a lone "1" on the left of the display.

The fix takes one second: click the dial up to the next range. If you see "OL" on the 20V range while testing a car battery, check that your dial is truly in the DC volts section and not parked on resistance or continuity.

A Reading That Bounces Around or Sits Near Zero

A near-zero reading on a battery you know has charge means bad contact or the wrong function. Check three things in order. First, confirm the dial points to V⎓ and not V~.

Second, look for corrosion or plastic film between the probe tip and the terminal. Third, verify the leads are seated fully in the COM and VΩ jacks.

A display that drifts and flickers usually means the meter's own internal 9V battery is dying. Low internal voltage makes budget meters unstable before they die outright. Swap it and the readings snap back to steady.

Testing Batteries With a Multimeter – AA Battery Testvia The Engineering Mindset

Voltage Tells You Charge, Not Health: The Load Test Gap

This is the single biggest limitation of the voltage test, so don't skip it. Resting voltage measures state of charge, meaning how full the tank is. It does not measure state of health, meaning how big the tank still is.

An old battery can charge to a beautiful 12.6V and hold almost no usable capacity behind that number.

Think of it like tire pressure on a bald tire. The gauge reads 35 PSI, everything looks fine, but the tire still can't grip. That's why a battery can pass a multimeter check on Tuesday and strand you on Friday.

Three tools close the gap:

  • The cranking test from earlier, which is a free load test using your own starter motor.
  • A dedicated load tester, around $20 to $40, which applies a heavy load while watching voltage.
  • A conductance tester, the handheld unit auto parts stores use for free battery checks, which estimates capacity electronically.

The practical rule: use your multimeter for routine checks and charging system diagnosis. But if the battery is more than three or four years old, or the car cranks slowly despite a good resting voltage, get a proper load test. Typical service life expectations run three to five years, and voltage alone won't tell you where in that window your battery sits.

Mistakes That Can Damage Your Meter or Battery

The voltage test itself is nearly risk-free because a voltmeter draws almost no current. Every dangerous scenario comes from the meter being set up for a different job. These are the ones worth engraving in memory.

  • Never test a battery on the ohms (Ω) or continuity setting. Resistance mode pushes the meter's own current into the circuit. A live battery pushes back, and the mismatch can fry the meter's internals.
  • Never test voltage with the red lead in the 10A jack. That jack is a near-zero-resistance path. Across a car battery, it's a dead short: sparks, a blown fuse, possibly a melted lead.
  • Never let the probe tips bridge both terminals. Metal tip touching both posts at once is a short circuit. On a AA it's a hot spark. On a car battery it can pit the terminals and weld the tip.
  • Keep sparks away from a charging lead-acid battery. Charging batteries vent hydrogen gas. OSHA guidance on battery charging areas exists precisely because hydrogen plus spark equals a real explosion risk.
  • Take off rings and metal watch bands. A wedding ring bridging the positive terminal and the car body carries enormous current and heats instantly.

One more habit worth building: check your meter's CAT rating, printed near the jacks. CAT II or CAT III meters built to IEC 61010 have internal protection that cheap unrated meters skip. For battery work the stakes are modest, but if this meter will ever touch mains wiring, the rating matters a lot.

If you're brand new to the tool, a first-session walkthrough covering all the functions is the safest starting point.

Do You Need a Better Multimeter for This? (Budget vs Fluke-Tier)

No, a budget meter measures battery voltage just fine. DC voltage is the easiest measurement a multimeter makes, and even $15 meters typically hold ±0.5% accuracy on it. The difference between a reading of 12.58V and 12.62V changes nothing about your decision.

Where the money goes in pricier meters is durability, safety, and features you don't need for battery work. True RMS capability, for instance, matters for measuring distorted AC waveforms, and here's what that spec covers if you're curious. It adds nothing to a DC battery check.

TierPriceWhat You GetBest For
Budget (AstroAI, Kaiweets)$15 to $30Accurate DC volts, basic buildBattery checks, household jobs
Mid-range (Klein, INNOVA)$40 to $80Better leads, real fuses, CAT IIIRegular DIY, automotive work
Professional (Fluke)$100+Rugged build, tight specs, HRC fusesDaily use, mains and industrial work

Two upgrades worth the money at any tier. Alligator clip leads free up both hands, which transforms the cranking test from awkward to easy. And a meter with a Min/Max function captures the lowest voltage during cranking automatically, so you don't have to watch the display mid-crank.

Battery Voltage Reference Chart: Every Common Battery Type

Bookmark this table. It condenses everything above into the numbers you'll actually check against, all measured at rest with the dial on DC volts.

Battery TypeFully ChargedNominalReplace or Recharge Below
Car battery (flooded)12.6 to 12.7V12V12.2V (recharge), 11.9V (suspect)
Car battery (AGM)12.8 to 12.9V12V12.4V (recharge)
Car battery, engine running13.5 to 14.7Vn/aBelow 13.5V = charging fault
AA / AAA / C / D alkaline1.5 to 1.6V1.5V1.3V
NiMH rechargeable1.4V1.2V1.0V (recharge)
9V alkaline9.0 to 9.6V9V8.4V
CR2032 coin cell3.0 to 3.3V3V2.8V
Li-ion single cell4.2V3.7V3.0V (recharge now)
20V max tool pack20 to 21V18V15V (recharge)

Remember the AGM offset when checking modern cars. Vehicles with start-stop systems usually run AGM or enhanced flooded batteries, and both sit slightly higher on the scale than the traditional flooded numbers. If you're not sure what's under your hood, the label on the battery case says, or you can match it against the common chemistry and construction options before judging your reading.

Temperature nudges everything too. These figures assume roughly room temperature. A battery tested at freezing reads about 0.1 to 0.2V lower without being any less charged.

Frequently Asked Questions

What setting should a multimeter be on to check battery voltage?

Set the dial to DC volts, shown as a V with a solid line over a dashed line. On a manual-ranging meter, choose the 20V range for car batteries and 9V cells, or the 2V range for AA and AAA cells. Never use the AC volts, resistance, or amps settings on a battery.

What voltage is too low for a 12 volt car battery?

Anything below 12.2V at rest means the battery needs charging right away. Below 11.9V, the battery is deeply discharged and may have permanent sulfation damage. If it won't hold 12.4V or better after a full overnight charge, have it load tested because replacement is likely.

Can a car battery read 12.6 volts and still be bad?

Yes, and it happens constantly. Resting voltage shows state of charge, not capacity. An aged battery can charge fully to 12.6V yet collapse below 9.6V the moment the starter draws current.

If the engine cranks slowly despite a good reading, get a load test or free conductance test at a parts store.

Why does my multimeter show a negative voltage on a battery?

Your probes are reversed. The red probe is touching the negative terminal and the black probe is on the positive. The number itself is still accurate, so -12.6V means a fully charged battery.

Swap the probes and the minus sign disappears. Nothing is damaged on a digital meter.

How do I know if a AA battery is still good with a multimeter?

Set the meter to DC volts on the 2V range. Touch red to the button top and black to the flat end. A fresh alkaline AA reads 1.5 to 1.6V.

Between 1.3 and 1.5V, it's fine for low-drain devices like remotes. Below 1.3V, replace it.

Is it safe to test a car battery with a multimeter?

Yes, a voltage check draws almost no current and poses minimal risk. The real dangers come from setup errors: using the amps jack or ohms setting, bridging both terminals with a probe, or making sparks near a charging battery that's venting hydrogen. Remove metal jewelry and keep the probes apart.

Your Next Step: From One Reading to a Real Diagnosis

You now have the full loop: identify the DC volts symbol, set the range, probe red to positive and black to negative, then judge the number against the charts above. That single skill sorts a dead drawer of AAs, catches a dying car battery before winter does, and separates alternator problems from battery problems in two minutes flat.

Make it a habit, not a one-off. Test your car battery at rest each fall before cold weather arrives, and again in spring if you live somewhere hot, since heat quietly shortens battery life. Comparing this year's resting number against last year's tells you more than any single reading can, and typical year-by-year decline patterns give you a benchmark for what's normal.

And when the voltage looks marginal, don't stop at the multimeter. Pair your reading with a cranking test or a free conductance check, then decide. A $20 meter plus five minutes of attention beats getting stranded every single time.

Ryan Carter is the founder of AutoVerse Authority. A self-taught gearhead from just outside Kansas City, he's spent 15 years buying, fixing, and living with cars — and now shares honest, hands-on advice so everyday drivers can save money and skip the dealership traps.

Share.

Similar Posts

What Should Alternator Voltage Be…Car Battery Reads 12V but Won&#82…How to Set a Multimeter to 20V DC…How Long to Drive After a Jump St…How to Test Parasitic Draw With a…Why Your Battery Voltage Drops Wh…Multimeter Setting for Car Batter…How to Test a Car Battery Without…How to Test a Car Battery With a …How to Use Back Probe Pins on a M…
Share